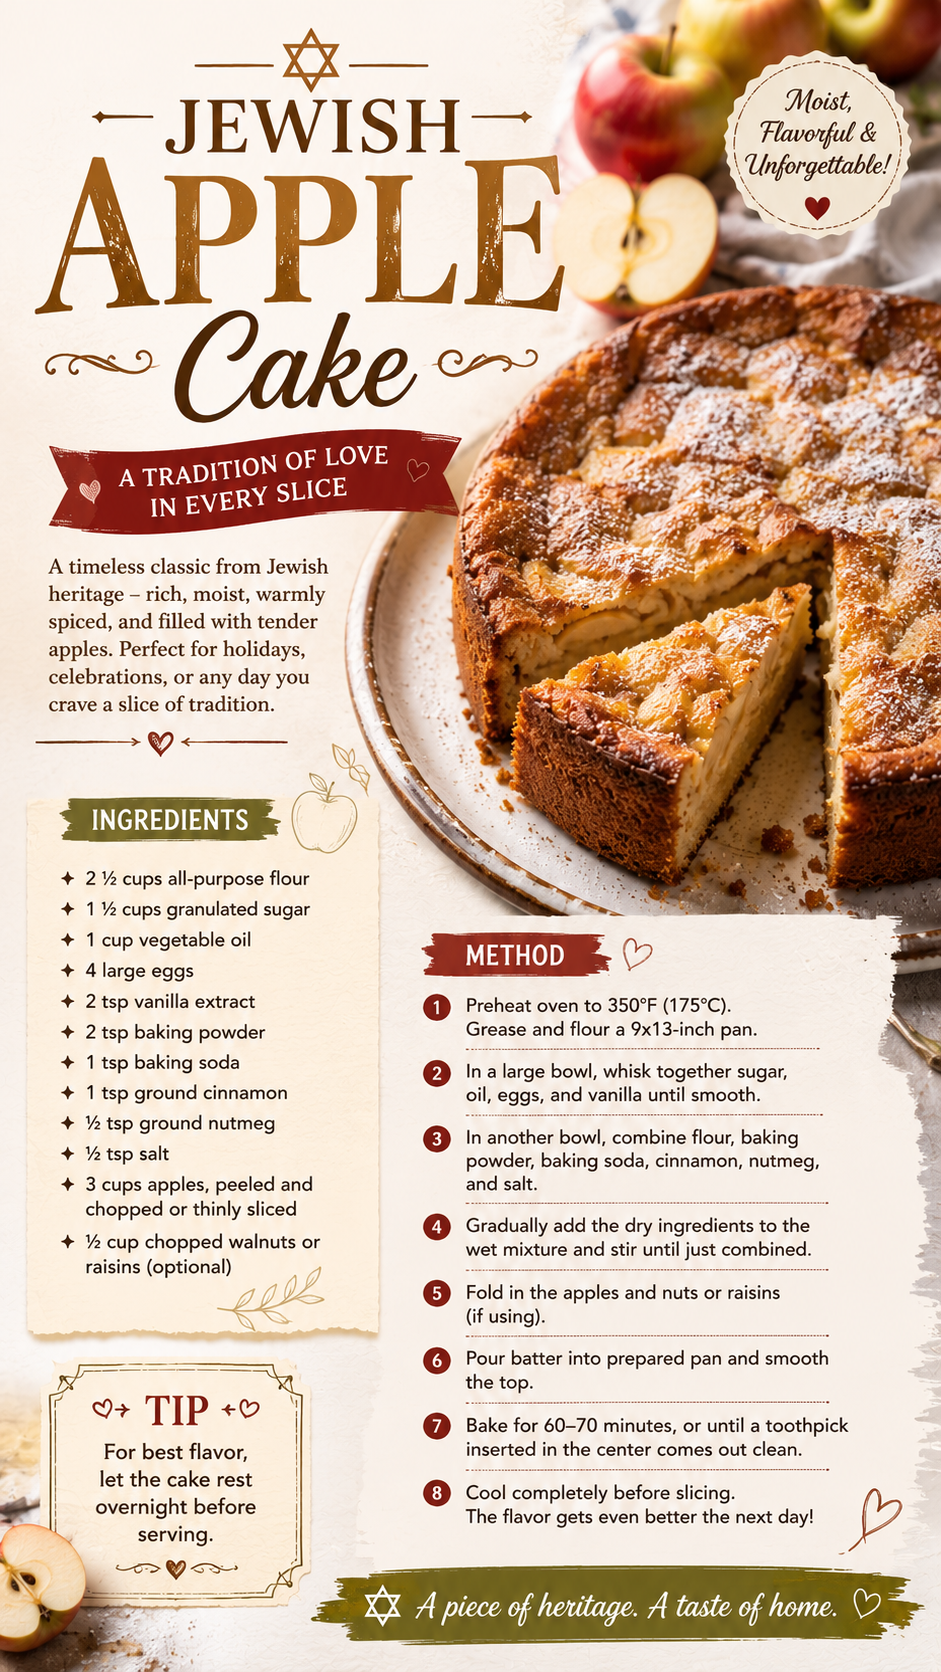
This cake doesn’t use a single tablespoon of butter, and it might be the moistest cake you’ll ever make.
That sentence shouldn’t work, but it does.
Jewish apple cake swaps butter for oil, which sounds like it should make a worse cake. Instead, it makes one that stays soft for days, doesn’t dry out in the fridge, and somehow gets even better the longer it sits.
There’s a reason behind the oil too, and it’s not just a flavor choice. This cake is traditionally made without dairy, which keeps it pareve under Jewish dietary law, meaning it can be served after a meal with meat. That one ingredient swap is doing a lot of quiet work. 🍎
This cake shows up most around Rosh Hashanah, the Jewish New Year, where apples symbolize a sweet year ahead. But honestly, it’s good enough to make any random week in October.
What Makes This Cake Different
Most apple cakes scatter apple slices on top and call it done.
This one layers them straight through the batter, which means every single bite gets some apple in it. No digging around for the good part.
The texture is what really sets it apart:
- Dense and moist, closer to a pound cake than a fluffy sponge
- Ribbons of cinnamon-apple running through the middle, not just on top
- A slightly crisp, caramelized edge where the batter meets the pan
And because it’s made with oil instead of butter, it actually holds up better over several days than most cakes do. It just gets more flavorful as it sits.
What You’ll Need
For the apples:
- 4 medium apples (Granny Smith, Honeycrisp, or Fuji), peeled, cored, and thinly sliced
- 5 tablespoons granulated sugar
- 2 teaspoons ground cinnamon
For the cake:
- 3 cups all-purpose flour
- 2 ½ cups granulated sugar
- 1 tablespoon baking powder
- 1 teaspoon kosher salt
- 4 large eggs
- 1 cup vegetable or canola oil
- ½ cup orange juice
- 2 teaspoons vanilla extract
Tools You’ll Need
- 10-inch tube pan or 12-cup bundt pan
- Large mixing bowls
- Whisk
- Rubber spatula
- Sharp knife and cutting board for slicing apples
- Wire cooling rack
How To Make Jewish Apple Cake
Step 1: Prep the apples
Peel, core, and thinly slice your apples. In a bowl, toss them with the sugar and cinnamon until evenly coated.
Let this sit for about 10 minutes. The sugar will pull some juice out of the apples, which adds even more flavor to the cake later.
Step 2: Preheat and prep your pan
Preheat your oven to 350°F (175°C).
Grease your tube or bundt pan generously, getting into every groove. This cake sticks easily if the pan isn’t fully coated, so don’t rush this part.
Step 3: Mix the dry ingredients
In a large bowl, whisk together the flour, sugar, baking powder, and salt.
Step 4: Mix the wet ingredients
In a separate bowl, whisk together the eggs, oil, orange juice, and vanilla extract until smooth.
Step 5: Combine
Pour the wet mixture into the dry ingredients and stir until just combined. The batter will be thick. That’s exactly what you want.
Step 6: Layer the batter and apples
Spread about a third of the batter into the bottom of your prepared pan.
Top with half of the apple mixture.
Add another third of the batter over the apples, then the rest of the apples.
Finish with the remaining batter on top, smoothing it out with a spatula.
Step 7: Bake
Bake for 55 to 65 minutes, or until a toothpick inserted into the center comes out clean.
Step 8: Cool
Let the cake cool in the pan for 15 to 20 minutes before removing it. Don’t let it cool all the way in the pan, or it may stick.
Once cooled completely, dust with powdered sugar if you’d like.
Pro Tips From Someone Who’s Baked This More Times Than I Can Count
1. Slice your apples thin and even. Thick slices take longer to soften and can leave pockets of undercooked apple in an otherwise perfectly baked cake. Aim for slices about a ¼ inch thick.
2. Don’t skip greasing every groove of the pan. This cake is dense and sticky, especially in a bundt pan with lots of decorative edges. Take the extra 30 seconds to grease thoroughly, or you’ll lose half your cake to the pan.
3. Resist pulling it out of the oven early. This cake looks done on the outside well before the inside actually is. Always check with a toothpick in the center, not just a glance at the top.
4. Use a tube pan if you have one. A tube pan keeps the apples more evenly distributed than a bundt pan, since the sides are straight instead of curved. A bundt pan still works, just expect slightly different apple distribution.
5. Let it rest overnight if you can. This cake genuinely tastes better the next day, once the flavors have had time to settle. If you can wait, you’ll be rewarded.
Substitutions and Variations
| Original | Swap | Why It Works |
|---|---|---|
| Vegetable oil | Olive oil (not extra virgin) | Adds a richer, slightly different flavor |
| Orange juice | Apple cider or apple juice | Leans further into the apple flavor |
| Granulated sugar | Brown sugar | Deeper, more caramel-like flavor |
| All-purpose flour | 1:1 gluten-free blend | Keeps the texture close to the original |
| Plain cake | Add chopped walnuts or pecans | Extra crunch and texture |
For a dairy version, some bakers add a cup of sour cream to the batter for extra richness. Just know this makes the cake no longer pareve.
Make Ahead Tips
This cake was basically made for make-ahead baking.
- Bake it up to 2 days in advance and store at room temperature in an airtight container.
- For longer storage, wrap tightly in plastic wrap, then foil, and freeze for up to 3 months.
- The apple mixture can be prepped and refrigerated up to a day ahead if you want to split up the work.
Nutritional Breakdown (Per Slice, Makes 12 Slices)
| Nutrient | Approximate Amount |
|---|---|
| Calories | 340 |
| Carbohydrates | 52g |
| Protein | 4g |
| Fat | 14g |
| Sugar | 35g |
| Fiber | 1g |
What To Pair It With
This cake is rich enough to stand completely on its own, but a few pairings take it even further.
A cup of strong coffee or tea balances out the sweetness nicely. For dessert tables, it pairs well alongside honey cake and other Rosh Hashanah staples.
A small drizzle of caramel sauce or a dusting of powdered sugar is really all it needs if you want to dress it up.
Leftovers and Storage
- Room temperature: Store in an airtight container for up to 4 days.
- Refrigerator: Keeps well for up to 5 days, and some people prefer the texture once it’s chilled.
- Freezer: Wrap tightly in plastic wrap and foil, then freeze for up to 3 months. Thaw at room temperature before serving.
This cake is sturdy enough to travel well, which makes it a great option for gifting or potlucks.
FAQ
Why did my cake stick to the pan? This almost always comes down to under-greasing. Make sure every groove and corner of the pan is coated, especially if you’re using a decorative bundt pan.
Can I use a 9×13 pan instead of a tube or bundt pan? Yes. A 9×13 pan holds about 14 cups, which works for this recipe, though baking time may need to be adjusted slightly shorter.
Why is my cake dense instead of fluffy? This cake is supposed to be dense, closer to a pound cake than a sponge cake. If it feels gummy rather than dense, it likely needed a few more minutes in the oven.
Is this cake actually dairy-free? Yes, as written. It uses oil instead of butter and has no milk, which keeps it pareve. Just double check any add-ins, since some variations include sour cream.
Can I make this with pears instead of apples? Yes. Firm pears work as a substitute and create a similar texture, though the flavor will be noticeably different.
Wrapping Up
This is the cake that proves you don’t need butter, frosting, or anything fancy to make something genuinely memorable.
It’s humble, it’s simple, and it tastes like it’s been made in someone’s kitchen for generations, because in a lot of families, it has been.
If you make this, I’d love to hear how it turned out. Drop a comment below and let me know which apples you used, or if you tried any of the swaps.
AI Image Generator Prompt (for the “What You’ll Need” section):
Create a high-resolution, 9:16 vertical image showing a top-down flat lay of all the ingredients and tools needed for making Jewish apple cake. Include: 4 whole apples (a mix of green and red) placed next to a small pile of thin apple slices, a small bowl of granulated sugar, a small dish of ground cinnamon, a bowl of all-purpose flour, a small dish of baking powder, a small dish of kosher salt, 4 brown eggs, a small glass pitcher of vegetable oil, a small glass of orange juice, and a tiny bottle of vanilla extract. Include a 10-inch tube pan or bundt pan, a large stainless steel mixing bowl, a whisk, a rubber spatula, and a sharp knife with a small cutting board, all arranged neatly around the ingredients. Set everything on a white marble countertop with subtle natural gold veining. Use soft, natural daylight coming from one side, soft shadows, and a warm, cozy autumn aesthetic. Shot in the popular top-down flat lay style used by food bloggers, as if captured with an iPhone 15 Pro, with crisp detail, true-to-life colors, and a slightly golden, inviting tone. No text or watermarks in the image.