You probably have a can of coconut milk sitting in the back of your pantry right now.
And you’ve probably been ignoring it.
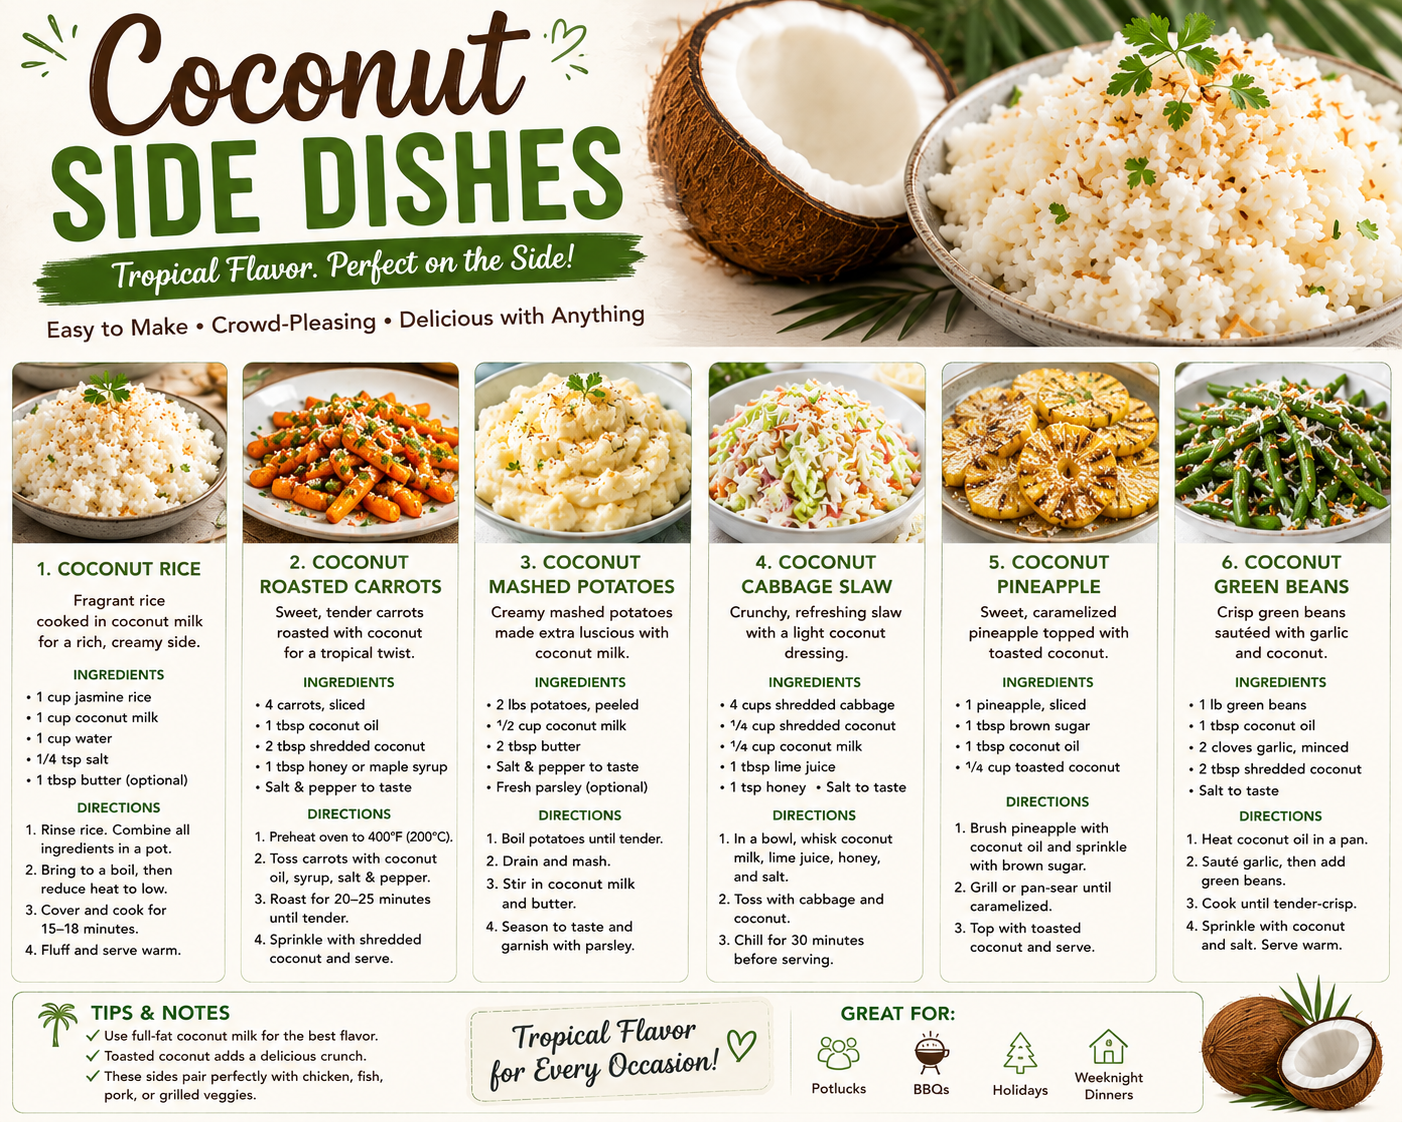
That ends today. Because once you learn how to turn coconut into a side dish, you’ll want it on the table every single night.
We’re talking creamy coconut rice, buttery coconut-glazed carrots, and a coconut corn that tastes like it came from a beachside restaurant somewhere tropical. These aren’t complicated. They’re not fussy. But they taste incredibly good.
And here’s the thing nobody tells you: coconut is one of the most underused ingredients in everyday cooking. It adds a natural richness and a subtle sweetness that makes ordinary vegetables taste extraordinary.
Stick around, because the Pro Tips section alone is worth bookmarking this page.

What You’ll Need
For the Coconut Rice
- 1 ½ cups long-grain white rice (jasmine works beautifully here)
- 1 can (13.5 oz) full-fat coconut milk
- ¾ cup water
- 1 tsp salt
- 1 tsp sugar (optional, but recommended)
- 2 tbsp shredded unsweetened coconut (for topping)
For the Coconut-Glazed Carrots
- 1 lb carrots, peeled and sliced into coins
- 3 tbsp coconut oil
- 2 tbsp honey or maple syrup
- ½ cup coconut milk (full-fat)
- ½ tsp ground ginger
- ¼ tsp cinnamon
- Salt to taste
- Fresh parsley or cilantro to garnish
For the Coconut Creamed Corn
- 4 cups corn kernels (fresh, frozen, or canned and drained)
- 1 can (13.5 oz) full-fat coconut milk
- 2 tbsp unsalted butter
- 1 small shallot, finely diced
- 2 garlic cloves, minced
- ½ tsp smoked paprika
- Salt and black pepper to taste
- Fresh lime juice (about half a lime)
- Fresh cilantro for garnish
Tools You’ll Need
- Medium saucepan with a lid (for the rice)
- Large skillet or frying pan
- Wooden spoon or silicone spatula
- Measuring cups and spoons
- Sharp knife and cutting board
- Peeler (for the carrots)
- Can opener
Pro Tips
These are the things I wish someone had told me the first time I cooked with coconut milk:
1. Always use full-fat coconut milk. The “light” version is mostly water. It’ll give you a thin, watery sauce instead of that thick, creamy, velvety texture you actually want. Don’t skip this.
2. Shake the can before opening. Coconut milk separates in the can. The thick cream rises to the top. Give it a good shake before you crack it open so it’s fully combined and ready to use.
3. Don’t rush the rice. Once the lid goes on the coconut rice, resist every urge to lift it. Steam escapes every time you peek, and you’ll end up with unevenly cooked rice. Set a timer and walk away.
4. Toast the shredded coconut before adding it. Dry-toast it in a pan for 2-3 minutes until it’s golden. The difference in flavor between raw and toasted coconut is massive. It goes from bland to nutty and fragrant.
5. Acid at the end changes everything. A squeeze of lime over the coconut corn right before serving cuts through the richness and brightens the whole dish. Don’t skip it. This one step makes the dish go from “really good” to “what IS this?!”
Substitutions and Variations
Cooking is personal, so swap freely:
| Ingredient | Swap For |
|---|---|
| Full-fat coconut milk | Coconut cream (even richer) |
| Honey | Maple syrup or agave |
| White rice | Brown rice (add 15-20 min cook time) |
| Carrots | Sweet potatoes or parsnips |
| Fresh corn | Frozen corn (works perfectly) |
| Butter | Vegan butter or coconut oil |
| Cilantro | Fresh mint or parsley |
Want it spicy? Add a pinch of cayenne or red pepper flakes to the glazed carrots.
Going vegan? Swap the butter for coconut oil and use maple syrup instead of honey. All three dishes become completely plant-based.
Nut-free concerns? Coconut is technically a tree nut, so check with anyone who has allergies before serving.
Make-Ahead Tips
These dishes are surprisingly meal-prep friendly:
- Coconut Rice: Makes great leftovers. Store in an airtight container in the fridge for up to 4 days. Add a tiny splash of water before reheating so it doesn’t dry out.
- Glazed Carrots: You can parboil the carrots (cook halfway) up to a day ahead and store them in the fridge. Finish the glaze the day of for the best texture.
- Coconut Creamed Corn: Best made fresh, but it holds well in the fridge for 2 days. Reheat gently over low heat and stir in a splash of coconut milk to bring it back to life.
Nutritional Breakdown
Here’s a rough per-serving breakdown for each side dish (based on 4 servings per recipe):
| Dish | Calories | Fat | Carbs | Protein |
|---|---|---|---|---|
| Coconut Rice | ~310 kcal | 12g | 46g | 5g |
| Coconut-Glazed Carrots | ~175 kcal | 10g | 21g | 1.5g |
| Coconut Creamed Corn | ~265 kcal | 16g | 28g | 4g |
Note: Coconut milk is high in saturated fat, but it’s medium-chain triglycerides (MCTs), which the body metabolizes differently than long-chain saturated fats. It’s still a food to enjoy in balanced amounts, not fear.
Meal Pairing Suggestions
These sides were basically made to sit next to:
- Grilled chicken thighs or salmon (the coconut rice especially)
- Thai-inspired peanut noodles
- Caribbean jerk pork or shrimp
- A simple green salad to balance the richness
- Pan-seared tofu for a fully plant-based plate
How to Make It
Step 1: Start the Coconut Rice
Rinse your rice until the water runs clear. This removes excess starch and prevents a gummy texture.
Add the rinsed rice, coconut milk, water, salt, and sugar to a medium saucepan. Stir once to combine.
Bring to a boil over medium-high heat, then reduce to the lowest possible simmer. Cover tightly with a lid.
Cook for 18 minutes without lifting the lid. Remove from heat and let it sit, still covered, for another 5 minutes. Fluff with a fork, then top with toasted shredded coconut before serving.
Step 2: Make the Coconut-Glazed Carrots
Heat coconut oil in a large skillet over medium heat. Add the carrot coins and cook for 5 minutes, stirring occasionally, until they start to soften and get a little golden on the edges.
Add the honey (or maple syrup), coconut milk, ginger, and cinnamon. Stir everything together and let it cook for another 8-10 minutes, stirring every couple of minutes.
You’re waiting for the liquid to reduce and turn into a glossy, sticky glaze. Season with salt, taste, adjust, and finish with fresh parsley or cilantro.
Step 3: Make the Coconut Creamed Corn
Melt butter in a large skillet over medium heat. Add the shallot and cook for 3 minutes until soft and translucent.
Add the garlic and cook for another minute until fragrant. Don’t let it burn.
Add the corn kernels and smoked paprika. Stir to coat. Cook for 3-4 minutes.
Pour in the coconut milk and stir. Let it simmer uncovered for 8-10 minutes, stirring occasionally, until the sauce thickens and coats the corn.
Finish with salt, black pepper, a squeeze of fresh lime, and a handful of cilantro. Taste it. You’ll want to eat it straight out of the pan. That’s completely normal.
Leftovers and Storage
| Dish | Fridge | Freezer |
|---|---|---|
| Coconut Rice | 4 days | Up to 1 month |
| Glazed Carrots | 3 days | Not recommended (texture changes) |
| Creamed Corn | 2 days | Up to 2 months |
When reheating the rice from frozen, place it in a microwave-safe bowl, add 1-2 tbsp of water, cover loosely, and microwave in 1-minute intervals until steamed through.
The creamed corn reheats best on the stovetop over low heat with an extra splash of coconut milk to loosen it back up.
FAQ
Can I use light coconut milk? You can, but the results will be noticeably thinner and less creamy. Full-fat gives you that rich, restaurant-quality texture. It’s worth it.
My coconut rice came out mushy. What happened? Too much liquid or too high a heat are usually the culprits. Make sure you’re measuring the coconut milk and water carefully, and that the simmer is truly low once the lid is on.
Can I make all three dishes at the same time? Yes! Start the rice first since it needs the most hands-off time. While it cooks, prep and cook the carrots. Start the creamed corn last, since it comes together fastest. Everything will finish around the same time.
Where do I find full-fat coconut milk? In the international or Asian foods aisle of most grocery stores. Look for brands where the ingredients list is just “coconut, water” with no stabilizers or fillers. Those tend to have the creamiest texture.
Can I use coconut cream instead of coconut milk? Yes, especially in the rice and creamed corn. It’ll make the result richer and more indulgent. Just know the flavor will be more intensely coconut-forward.
Are these dishes kid-friendly? Very much so. The sweetness from the coconut and honey makes the carrots especially popular with kids. The creamed corn is a crowd-pleaser across all ages.
Wrapping Up
Here’s the honest truth: side dishes don’t have to be an afterthought.
These three coconut side dishes — the fluffy coconut rice, the sticky glazed carrots, and the creamy corn — are the kind of things that make people at the dinner table ask, “wait, what did you put in this?”
And the answer is just coconut milk and a little bit of intention.
You don’t need a fancy kitchen or an hour of prep time. You need a can of coconut milk, some fresh produce, and about 30 minutes. That’s it.
Give one (or all three 😄) a try this week and come back to leave a comment below. Tell me which one you made, what you paired it with, and whether it made it into your regular rotation. I read every single comment and I’d genuinely love to hear how it went!