Cold weather hits and suddenly your body just knows what it wants.
Not a salad. Not a grain bowl. A big, thick, deeply savory bowl of split pea soup that warms you from the inside out.
The kind that fills your whole kitchen with this smell that makes people wander in asking, “What are you making?”
Split pea soup has a reputation for being a little boring or old-fashioned. And honestly? That reputation is completely wrong. When it’s made right, it’s one of the most satisfying, comforting soups you’ll ever put on the stove.
And the fact that a bag of dried split peas costs almost nothing? That’s just a bonus 🙌
What You’ll Need
For the Soup:
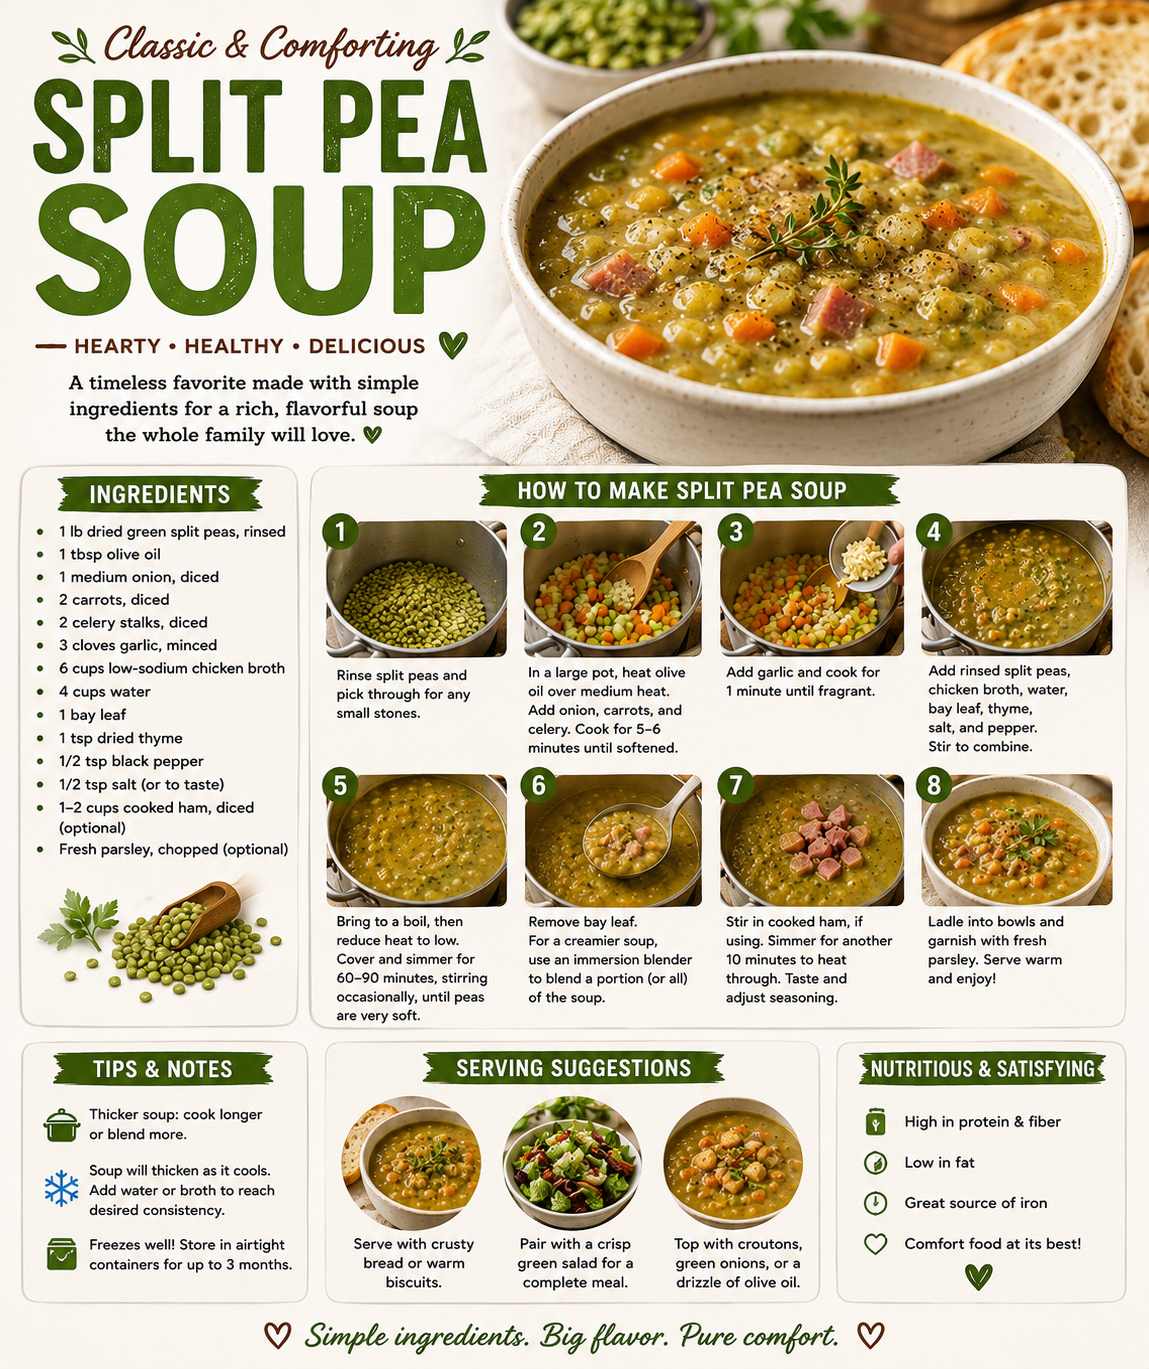
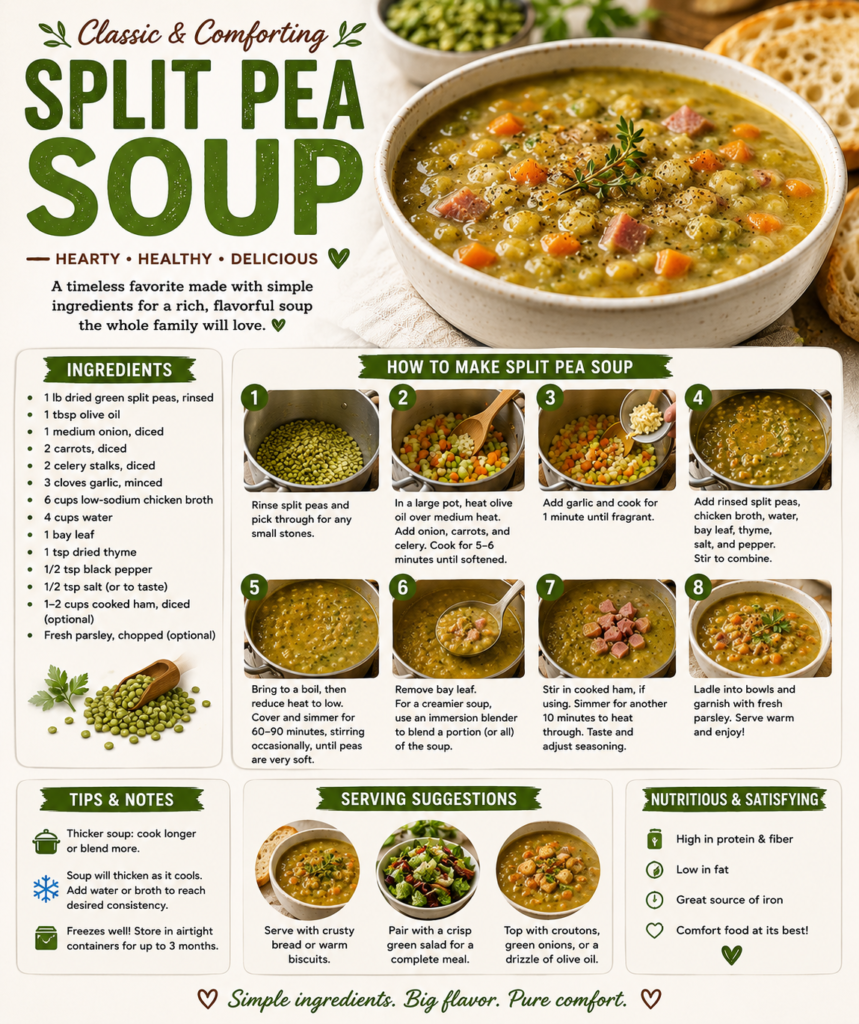
- 1 lb (about 2 cups) dried green split peas, rinsed
- 1 tablespoon olive oil
- 1 medium yellow onion, diced
- 3 garlic cloves, minced
- 3 medium carrots, peeled and diced
- 3 celery stalks, diced
- 1 smoked ham hock (or 1 cup diced cooked ham)
- 8 cups low-sodium chicken broth (or vegetable broth)
- 1 teaspoon dried thyme
- 1 bay leaf
- Salt and black pepper to taste
- Fresh parsley or croutons for topping (optional, but recommended)
Tools You’ll Need
- Large heavy-bottomed pot or Dutch oven
- Wooden spoon or silicone spatula
- Cutting board and sharp knife
- Measuring cups and spoons
- Immersion blender (optional, for a creamier texture)
- Ladle
Pro Tips
These are the things I wish someone told me before making split pea soup for the first time.
- Don’t skip rinsing the peas. Run them under cold water and pick out any shriveled ones. It takes 2 minutes and makes a difference.
- Low and slow is your friend. This soup gets its depth from a long, gentle simmer. Rushing it on high heat won’t give you the same result.
- The ham hock is doing a lot of heavy lifting. If you can find a smoked ham hock at your grocery store or butcher, use it. The smokiness it adds to the broth is unreal. You can always shred the meat off the bone and stir it back in at the end.
- Taste and adjust at the end, not the beginning. The broth reduces and concentrates as it cooks, so what tastes bland at 30 minutes will taste completely different at 90. Season at the end.
- Blend half, not all. If you want a soup that’s thick but still has some texture, blend only about half of it. It gives you the best of both worlds.
Instructions
Step 1: Sauté the Aromatics
Heat the olive oil in your pot over medium heat.
Add the diced onion, carrots, and celery. Cook for about 6 to 8 minutes, stirring occasionally, until everything softens up and the onion turns a little translucent.
Add the garlic and cook for another minute.
Step 2: Add Everything Else
Stir in the rinsed split peas, ham hock, chicken broth, thyme, and bay leaf.
Give it a good stir and bring the whole thing up to a boil.
Step 3: Simmer
Once it’s boiling, reduce the heat to low, put the lid on slightly ajar, and let it simmer for 60 to 90 minutes.
You’ll know it’s done when the peas have completely broken down and the soup is thick and creamy. Stir it every 20 minutes or so to make sure nothing sticks to the bottom.
Step 4: Remove the Ham Hock
Pull the ham hock out of the pot and set it on a cutting board.
Let it cool slightly, then shred any meat off the bone with two forks. Discard the bone and skin, and stir the shredded meat back into the soup.
Remove and discard the bay leaf.
Step 5: Blend (Optional)
If you want a silkier texture, use an immersion blender to blend about half the soup directly in the pot. Or leave it as-is for a chunkier, more rustic result.
Step 6: Season and Serve
Taste the soup and season with salt and pepper. Ladle into bowls and top with fresh parsley or croutons.
Substitutions and Variations
Split pea soup is one of those recipes that’s super flexible. Here’s how to make it work for you:
- No ham hock? Use diced smoked sausage, leftover cooked bacon, or just skip the meat entirely for a vegetarian version.
- Vegetarian or vegan? Swap the chicken broth for vegetable broth and skip the ham. The soup is still incredibly flavorful.
- Yellow split peas instead of green? Totally fine. Yellow peas have a slightly milder, sweeter flavor and the soup will come out a little lighter in color.
- Add a potato? Dicing one medium russet potato and adding it with the peas makes the soup even heartier.
- Spice it up? A pinch of smoked paprika or a tiny dash of cayenne added with the aromatics gives it a subtle kick that’s really good.
Make-Ahead Tips
This soup was practically made for meal prep.
You can make the entire pot up to 4 days in advance and store it in the fridge. The flavors actually get better on days two and three. It also freezes beautifully for up to 3 months.
One thing to keep in mind: split pea soup thickens up a lot as it cools. When you reheat it, just add a splash of broth or water and stir it over medium heat until it loosens back up.
Nutritional Info (Per Serving, Approximate)
This recipe makes about 6 servings.
| Nutrient | Amount per Serving |
|---|---|
| Calories | ~320 kcal |
| Protein | 22g |
| Carbohydrates | 38g |
| Fiber | 15g |
| Fat | 7g |
| Sodium | ~620mg (varies with broth) |
Split peas are genuinely one of the most underrated ingredients out there. They’re loaded with plant-based protein, high in fiber, and low in fat.
Fun fact: One cup of cooked split peas has more fiber than most people get in an entire day. 🌿
Meal Pairing Suggestions
This soup is a complete meal on its own, but if you want to round it out:
- A thick slice of crusty sourdough bread or a warm dinner roll
- A simple green salad with a light vinaigrette
- Cornbread (it’s a surprisingly good pairing)
- Grilled cheese on the side if you want to go full comfort food
Leftovers and Storage
Split pea soup stores really well.
- Fridge: Store in an airtight container for up to 4 days.
- Freezer: Freeze in individual portions for up to 3 months. Let thaw overnight in the fridge before reheating.
- Reheating: Warm on the stovetop over medium-low heat, adding broth or water as needed to get it back to your preferred consistency.
Pro move: Freeze individual servings in Mason jars or freezer-safe containers. Then you’ve got a ready-to-go lunch on any given day without doing any work.
FAQ
Do I need to soak split peas before cooking?
Nope! Unlike dried beans, split peas don’t need to be soaked overnight. Just rinse them and they’re good to go.
My soup isn’t thickening. What’s happening?
Give it more time. The peas need a full 60 to 90 minutes to fully break down. If it still seems thin after that, just leave the lid off for the last 15 minutes and let some of the liquid evaporate.
Can I make this in a slow cooker?
Yes. Add everything to the slow cooker and cook on low for 7 to 8 hours or high for 4 to 5 hours. Remove the ham hock, shred the meat, and stir it back in before serving.
Can I make this in an Instant Pot?
Absolutely. Cook on high pressure for 15 minutes with a natural release for 15 minutes. Works great.
Is split pea soup gluten-free?
Split peas are naturally gluten-free. Just double check the label on your broth to make sure there are no additives.
Why does my soup turn grayish-green?
That’s totally normal. Green split peas oxidize as they cook and the color mutes. It doesn’t affect the flavor at all.
Wrapping Up
Here’s the thing about split pea soup: it’s one of those dishes that costs almost nothing to make, takes minimal effort, and delivers maximum comfort.
It’s thick, smoky, filling, and the kind of soup that makes you want to curl up on the couch with a bowl and not move for a while.
If you’ve been sleeping on split pea soup because it seemed too basic or old-school, consider this your sign to try it.
And when you do, I want to hear about it! Drop a comment below and tell me how it turned out. Did you go with the ham hock? Did you blend it smooth or keep it chunky? Any substitutions that worked really well?
Leave your questions down there too. Happy to help you troubleshoot anything 👇