You’ve bitten into a store-bought sub roll and felt nothing. Bland, dry, forgettable.
Now you’re going to bite into this — a warm, pillowy, golden-brown roll you made from scratch — and it’s genuinely going to feel unfair that you waited this long.
Sub rolls that are crispy on the outside, soft and chewy on the inside, and actually hold up to a loaded sandwich without falling apart? Yes. That’s what we’re making today.
And here’s the thing nobody tells you: they’re not hard. If you can stir ingredients together and wait (most of the time is hands-off), you can do this. Even if you’ve never made bread before in your life.

What You’ll Need
For the Dough
- 3 ½ cups (420g) bread flour, plus more for dusting
- 2 ¼ tsp (one packet) active dry yeast
- 1 tsp granulated sugar
- 1 ½ tsp fine sea salt
- 1 tbsp olive oil
- 1 cup (240ml) warm water (around 110°F / 43°C)
- 2 tbsp warm whole milk
- 1 large egg (for egg wash)
- 1 tbsp water (for egg wash)
Optional Toppings
- Sesame seeds
- Poppy seeds
- Flaky sea salt
- Everything bagel seasoning
Tools You’ll Need
- Stand mixer with dough hook (or a large mixing bowl if kneading by hand)
- Large mixing bowl (for the first rise)
- Baking sheet
- Parchment paper
- Kitchen towel or plastic wrap (for covering the dough)
- Bench scraper or knife (for dividing the dough)
- Pastry brush (for the egg wash)
- Kitchen scale (optional but very helpful)
- Instant-read thermometer (optional, but takes the guesswork out of water temp)
Pro Tips
These are the things I wish someone told me the first time I made sub rolls.
- Use bread flour, not all-purpose. The higher protein content is what gives sub rolls that satisfying chew. All-purpose will work in a pinch, but you’ll notice the difference.
- Water temperature matters more than you think. Too hot kills the yeast. Too cold and it won’t activate properly. Aim for 105-115°F (40-46°C). If you don’t have a thermometer, it should feel warm on your wrist — not hot.
- Don’t skip the second rise. The second proof is what gives these rolls their light, airy interior. Rushing it results in dense, bread-brick energy. Give it the full time.
- Score the tops before baking. A shallow slash down the center of each roll controls how they expand in the oven and gives them that classic sub roll look. Use a sharp knife or bread lame.
- Add steam in the oven. Place a small oven-safe dish filled with hot water on the bottom rack while baking. The steam creates a crispier crust. Game changer.
Substitutions and Variations
Flour:
- Bread flour → All-purpose flour works (texture will be slightly less chewy)
- Want whole wheat? Swap up to ½ cup of the bread flour for whole wheat flour
Yeast:
- Active dry → Instant yeast works too. Skip the proofing step and mix it directly with the dry ingredients
- Reduce by about 25% if using instant yeast
Dairy-free:
- Replace whole milk with any plant-based milk (oat milk works especially well)
Oil:
- Olive oil → Neutral vegetable oil, avocado oil, or melted butter all work
Flavor additions:
- Mix dried herbs like rosemary or garlic powder directly into the dough
- Brush with garlic butter right out of the oven instead of (or in addition to) the egg wash
Make Ahead Tips
Sub rolls are actually a dream to make ahead.
Option 1: Refrigerate after the first rise. After the dough has doubled, punch it down, shape the rolls, place them on the baking sheet, cover tightly with plastic wrap, and refrigerate overnight. The next morning, pull them out, let them come to room temperature and finish the second rise (about 1.5-2 hours), then bake as directed.
Option 2: Freeze the baked rolls. Let them cool completely, then freeze in a zip-lock bag for up to 3 months. To reheat, wrap in foil and bake at 350°F (175°C) for 10-15 minutes, or just thaw at room temperature.
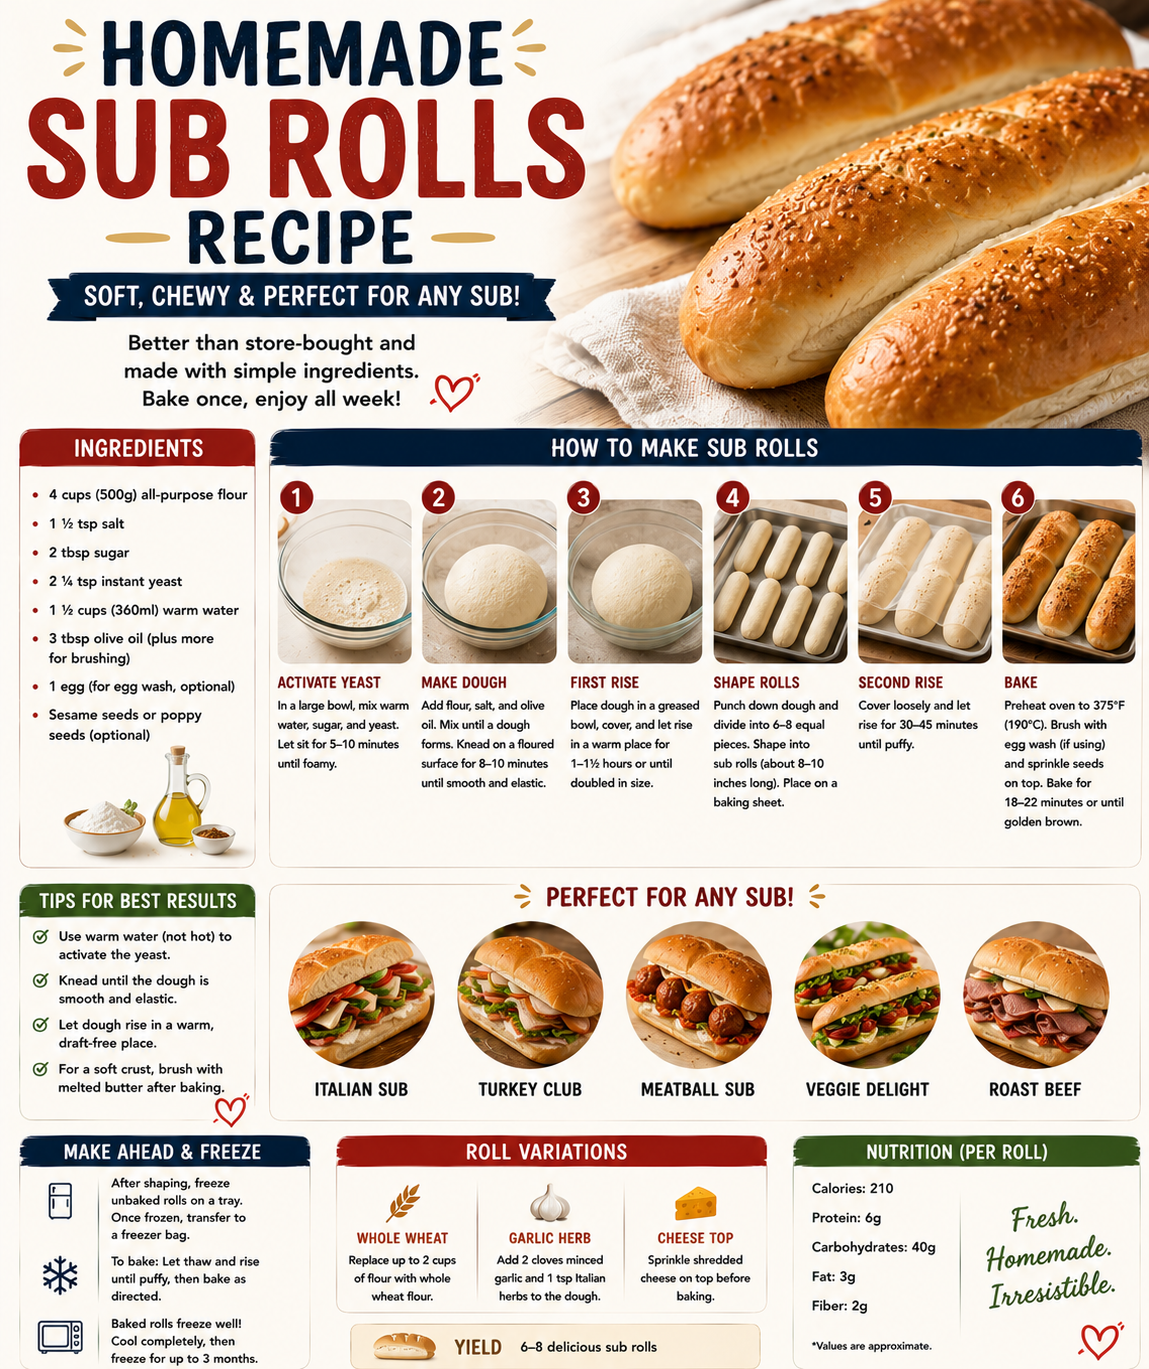
Instructions
Step 1: Proof the Yeast
In a small bowl, combine the warm water, warm milk, sugar, and active dry yeast. Stir gently and let it sit for 5-10 minutes until it’s foamy and smells like bread. If nothing happens, your yeast is dead — start fresh.
Step 2: Mix the Dough
In the bowl of a stand mixer (or a large bowl), add the bread flour and salt. Pour in the yeast mixture and olive oil. Mix on low with the dough hook until a shaggy dough forms, then increase to medium and knead for 8-10 minutes until the dough is smooth, slightly tacky, and pulls away from the sides of the bowl.
If kneading by hand: turn the dough out onto a lightly floured surface and knead for 10-12 minutes.
Test: The dough should pass the windowpane test — stretch a small piece between your fingers. If you can see light through it without tearing, it’s ready.
Step 3: First Rise
Shape the dough into a ball and place it in a lightly oiled bowl. Turn it once to coat. Cover with a clean kitchen towel or plastic wrap and let it rise in a warm spot for 1 to 1.5 hours, or until doubled in size.
No warm spot? Turn your oven on to 200°F (93°C) for 2 minutes, then turn it off. Place the dough inside with the oven light on. Works every time.
Step 4: Shape the Rolls
Once doubled, punch the dough down to release the gas. Turn it out onto a lightly floured surface. Divide into 6 equal pieces (use a kitchen scale for precision — about 115g each).
To shape each roll:
- Flatten a piece of dough into a rough rectangle
- Fold the long edges toward the center, then roll it tightly from one short end to the other
- Pinch the seam closed and place seam-side down on a parchment-lined baking sheet
They should be about 6-7 inches long. Space them 2 inches apart.
Step 5: Second Rise
Cover the shaped rolls loosely with lightly oiled plastic wrap. Let them rise again for 45 minutes to 1 hour, until noticeably puffed up.
While they rise, preheat your oven to 400°F (205°C). Place an oven-safe dish on the bottom rack and get a cup of hot water ready.
Step 6: Egg Wash and Score
Whisk together the egg and 1 tbsp water. Brush a light, even layer over each roll. Sprinkle with any optional toppings at this point.
Using a sharp knife or bread lame, make one shallow score down the center of each roll, about ¼ inch deep.
Step 7: Bake
Pour the hot water into the oven-safe dish on the bottom rack (careful — steam!). Place the baking sheet on the middle rack and bake for 18-22 minutes, until the rolls are deep golden brown and sound hollow when tapped on the bottom.
Internal temperature should be around 190-200°F (88-93°C) if you want to be sure.
Step 8: Cool
Transfer to a wire rack and let cool for at least 15-20 minutes before slicing. Cutting too early lets steam escape and can make the interior gummy. Patience here is worth it 🙌
Nutrition Information (Per Roll, Approximate)
| Nutrient | Amount |
|---|---|
| Calories | ~260 kcal |
| Carbohydrates | 46g |
| Protein | 9g |
| Fat | 4g |
| Fiber | 2g |
| Sodium | 340mg |
Values are estimates and will vary based on exact ingredients and toppings used.
Meal Pairing Suggestions
These rolls are incredibly versatile. A few ways to use them:
- Italian sub: Salami, capicola, provolone, pepperoncini, oil and vinegar
- Meatball sub: Homemade beef meatballs, marinara, melted mozzarella
- Philly cheesesteak: Shaved beef, sautéed peppers and onions, provolone or Cheez Whiz
- Veggie sub: Roasted zucchini, sun-dried tomatoes, hummus, arugula
- Breakfast sub: Scrambled eggs, cheddar, avocado, and hot sauce
Leftovers and Storage
Room temperature: Store in a zip-lock bag or wrapped tightly in plastic wrap for up to 2 days.
Refresh them: Day-old rolls? Run them under water very briefly, then bake at 375°F (190°C) for 5-7 minutes. They’ll taste fresh again. Seriously.
Freezer: Freeze baked, cooled rolls in a sealed bag for up to 3 months. Reheat from frozen wrapped in foil at 350°F (175°C) for 12-15 minutes.
Avoid the refrigerator: It actually stales bread faster. Freezer or room temp is the way to go.
FAQ
Can I make these without a stand mixer? Absolutely. Kneading by hand takes about 10-12 minutes and is a solid arm workout. You’ll know the dough is ready when it’s smooth and springs back slightly when you poke it.
Why did my rolls turn out dense? The most common culprits: yeast that wasn’t properly activated (always proof first), water that was too hot and killed the yeast, or not enough rise time. Make sure your dough actually doubles — don’t rush either rise.
Can I make these smaller for slider-size rolls? Yes — divide into 12 pieces instead of 6 and reduce the baking time to 14-16 minutes. Watch them closely toward the end.
My rolls spread out instead of rising up. What happened? The dough was probably too wet or the shaping was too loose. Make sure you’re rolling the dough tightly and pinching the seam well. A dough that’s properly shaped holds its form and rises upward, not outward.
Can I use a bread machine for the dough? Yes — use your machine’s dough cycle for the mixing and first rise, then pull the dough out to shape and do the second rise manually.
Do I really need the steam in the oven? You don’t need it, but it makes a real difference in crust quality. Without it, the crust will be slightly thicker and less shiny. Still delicious — just not quite as bakery-worthy.
Can I double the recipe? Easily. The dough scales well. Just make sure your mixer bowl is large enough, and don’t crowd the baking sheet — bake in two batches if needed.
Wrapping Up
Here’s the thing about homemade sub rolls: once you make them, store-bought ones start feeling like a downgrade. And not in a snobbish way — just in a “why would I go back?” kind of way.
They’re the kind of thing that makes a regular Tuesday feel a little more special. You made bread. From scratch. In your own kitchen.
And honestly? That’s worth celebrating.
Give this recipe a try this week, then come back and drop a comment below. Tell me what sandwich you built, how the rolls turned out, or any questions you have along the way. I read every single one. 👇