You know that moment when you frost a cake and the frosting steals the whole show? That’s what this recipe does. Every single time.
This chocolate frosting is silky, deeply chocolatey, and pipes like a dream. It works on layer cakes, cupcakes, brownies, cookies — honestly, a spoon. No judgment.
And the best part? It takes about 10 minutes to make from scratch. Once you try it, the canned stuff will never make sense again.
There’s one ingredient ratio in this recipe that most people get wrong. Stick around — it makes all the difference between frosting that tastes flat and frosting that tastes like it came from a serious bakery.
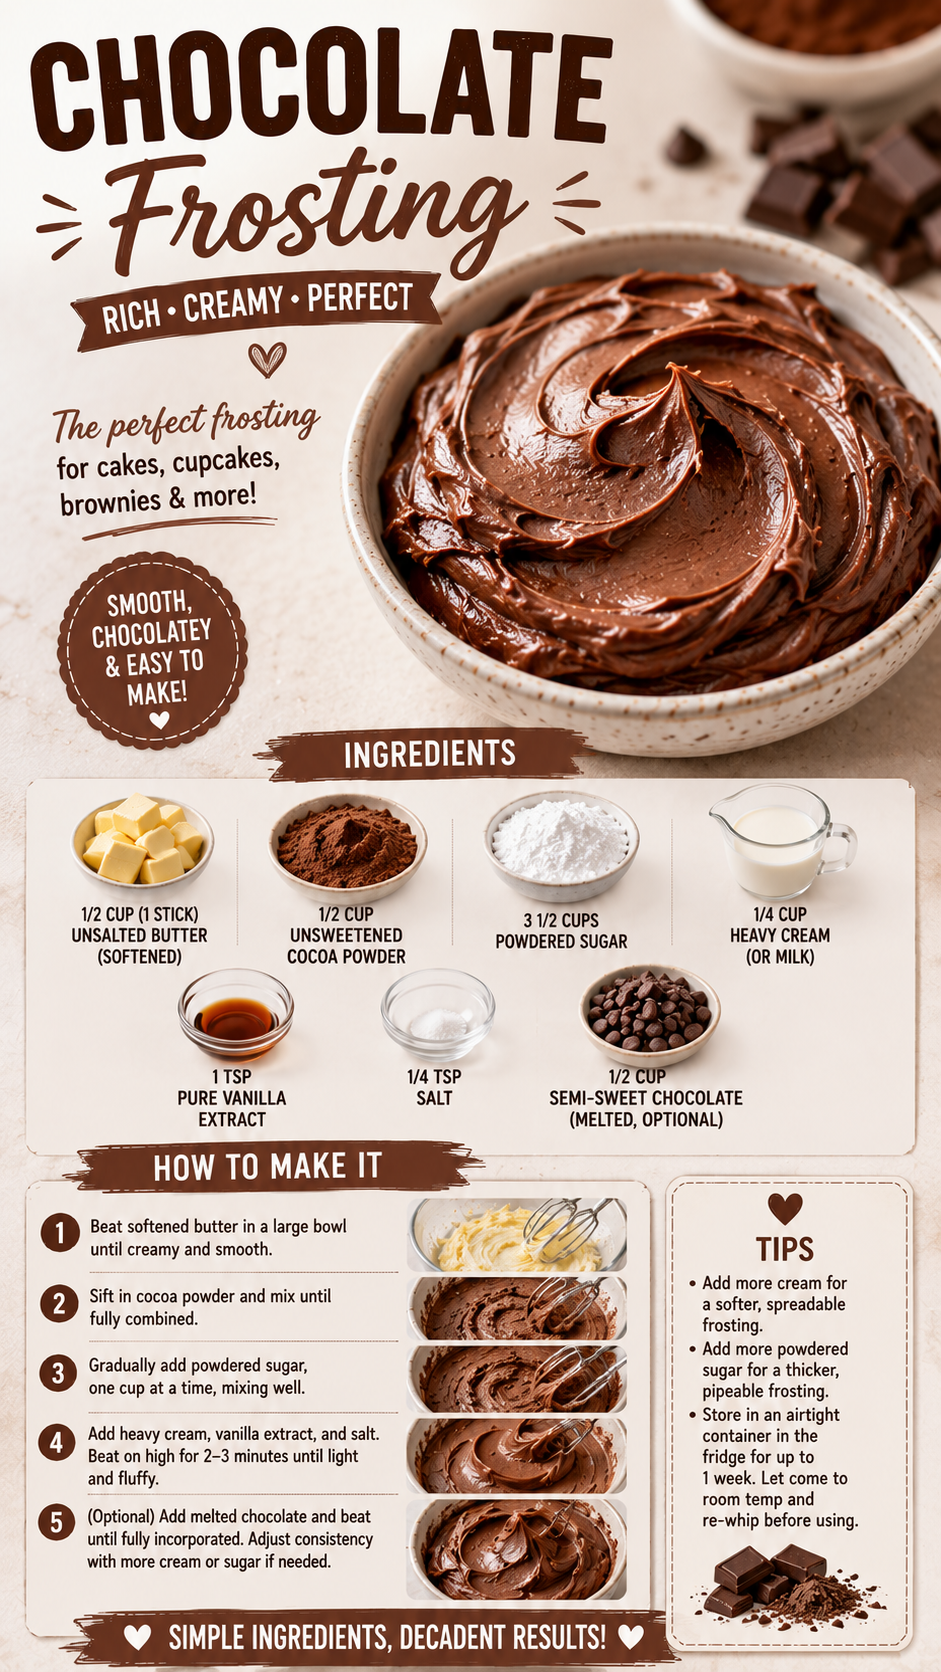
What You’ll Need
For the Chocolate Frosting
- 1 cup (2 sticks) unsalted butter, softened to room temperature
- 3 cups powdered sugar, sifted
- ⅔ cup Dutch-process unsweetened cocoa powder, sifted
- 4–5 tbsp heavy cream (or whole milk)
- 2 tsp pure vanilla extract
- ¼ tsp salt
- 2 oz dark chocolate (70%), melted and cooled (optional but game-changing)
Tools You’ll Need
- Stand mixer or hand mixer
- Large mixing bowl
- Fine mesh sieve or sifter (for powdered sugar and cocoa)
- Rubber spatula
- Offset spatula (for spreading)
- Piping bag + tip (optional, for decorating)
- Small microwave-safe bowl (for melting chocolate)
Pro Tips
These are the things that separate a good chocolate frosting from a great one.
- Sift everything. Both the powdered sugar and cocoa powder. Every time. Lumpy frosting is almost always caused by skipping this step, and no amount of beating will fully fix it once the lumps are in there.
- Soft butter is non-negotiable. It should be soft enough that your finger leaves an indent easily, but not shiny or greasy-looking. Too cold and the frosting won’t whip up light. Too warm and it’ll be soupy. Take it out of the fridge 1–2 hours before you start.
- Add the melted dark chocolate. This is the optional ingredient that isn’t actually optional if you want bakery-level depth. Melted dark chocolate adds a richness and complexity that cocoa powder alone can’t replicate. Let it cool to room temperature before adding so it doesn’t melt your butter.
- Beat longer than you think. After everything is in the bowl, beat on medium-high for a full 3–4 minutes. The frosting will go from dense and dark to lighter in color and noticeably fluffier. That’s what you want.
- Adjust consistency with cream, not more sugar. If your frosting is too thick, add heavy cream one teaspoon at a time. Adding more powdered sugar to loosen it just makes it sweeter and can throw off the whole flavor balance.
Substitutions and Variations
Butter: Vegan butter works well — use a high-fat block-style variety, not a spread.
Heavy cream: Whole milk works fine. For dairy-free, use full-fat coconut cream.
Cocoa powder: Natural cocoa powder can substitute, but the flavor will be slightly more bitter and the color lighter. Dutch-process gives that deeper, darker, richer result.
Dark chocolate: Milk chocolate can be used for a sweeter, milder frosting. Semi-sweet also works. Skip altogether if you want a simpler, lighter version.
Flavor variations:
- Add 1 tsp of espresso powder for a mocha frosting that tastes incredible on chocolate cake
- Add ½ tsp of peppermint extract for a mint chocolate version (amazing on brownies)
- Replace vanilla with almond extract for a slightly nutty, more complex flavor
- Add 2 tbsp of peanut butter for a chocolate peanut butter frosting that people will request on repeat
- Stir in a pinch of cayenne and cinnamon for a Mexican chocolate version
Make Ahead Tips
Chocolate frosting is one of the easiest things to make ahead.
Refrigerator: Store in an airtight container for up to 2 weeks. Before using, let it sit at room temperature for 30–45 minutes, then re-beat with a mixer until fluffy and smooth again.
Freezer: Freeze in an airtight container for up to 3 months. Thaw overnight in the fridge, then bring to room temperature and re-whip.
Tip: If the frosting looks broken or curdled after re-whipping, just keep going. It almost always comes back together after another minute of beating.
How to Make Chocolate Frosting
Step 1: Prep Your Ingredients
- Make sure your butter is fully softened — it should dent easily when pressed.
- Sift the powdered sugar and cocoa powder together into a bowl. Set aside.
- If using melted dark chocolate, melt it in a microwave-safe bowl in 20-second bursts, stirring between each. Let it cool until it’s no longer warm to the touch.
Step 2: Beat the Butter
- Beat the softened butter on medium speed for 2–3 minutes until it’s pale, smooth, and fluffy. This step is the base of everything — don’t rush it.
Step 3: Add the Dry Ingredients
- With the mixer on low, gradually add the sifted powdered sugar and cocoa mixture in two additions, mixing between each.
- Add the vanilla extract and salt.
- Add 4 tablespoons of heavy cream.
Step 4: Whip It Up
- Increase the speed to medium-high and beat for 3–4 minutes until the frosting is light, fluffy, and significantly lighter in color.
- Add the melted, cooled dark chocolate (if using) and beat for another 30 seconds until fully incorporated.
- Check the consistency. If it’s too thick to spread or pipe, add the remaining tablespoon of cream. If it’s too soft (this can happen in a warm kitchen), refrigerate for 15 minutes then re-beat.
Step 5: Use or Store
- Use immediately, or transfer to an airtight container and refrigerate until needed.
That’s it. Ten minutes. One bowl. Completely worth it.
How Much Frosting Do You Need?
| What You’re Frosting | Amount This Recipe Makes |
|---|---|
| 12 cupcakes (generously piped) | 1 batch |
| 9×13 inch sheet cake | 1 batch |
| 2-layer 8-inch round cake | 1 batch |
| 3-layer 8-inch round cake | 1.5 batches |
| 9×13 brownies (thick layer) | 1 batch |
Nutrition Breakdown
Per serving (approximately 2 tablespoons), based on 16 servings per batch
| Nutrient | Amount |
|---|---|
| Calories | ~210 kcal |
| Total Fat | 13g |
| Saturated Fat | 8g |
| Carbohydrates | 25g |
| Sugar | 23g |
| Protein | 1g |
| Sodium | 40mg |
Estimates only and will vary based on brand and whether dark chocolate is included.
Dietary Swaps
| Diet | Swap |
|---|---|
| Dairy-free | Vegan block butter + full-fat coconut cream |
| Lower sugar | Reduce powdered sugar by ½ cup; frosting will be less sweet and slightly denser |
| Vegan | Vegan butter + plant-based cream (oat or coconut) |
What to Put This Frosting On
This frosting is genuinely good on almost everything. A few favorites:
- Chocolate layer cake — the obvious one, and it works perfectly
- Vanilla cake — the contrast between the mild cake and rich frosting is actually excellent
- Cupcakes — piped high with a 1M star tip, they look bakery-made
- Brownies — a thick swipe over fudgy brownies is hard to argue with
- Cookies — sugar cookies, chocolate cookies, sandwich cookies
- Waffles or pancakes — yes, really. A small dollop on warm waffles is a weekend win
Leftovers and Storage
At room temperature: Frosted cakes and cupcakes are fine at room temperature for up to 2 days (in a cool kitchen, away from direct sunlight).
Refrigerator: Frosted desserts keep in the fridge for up to 5 days. Bring to room temperature before serving — cold frosting can taste flat.
Frosting on its own: Keeps refrigerated in an airtight container for 2 weeks. Re-whip before using.
Freezer (frosting only): Up to 3 months. Thaw in fridge overnight, then re-whip.
Tip: A slightly dome-topped container works better than a flat lid — it won’t drag across the surface and ruin your frosting when you close it.
FAQ
Why does my frosting taste gritty? Almost always from undissolved powdered sugar. Make sure you sift it before adding, and beat long enough for everything to fully incorporate. The gritty texture usually disappears after 3–4 minutes of beating on medium-high.
Can I make this without a mixer? Technically yes, but it’s a real arm workout and you won’t get the same fluffy texture. A hand mixer is the minimum — stand mixer is ideal.
My frosting is too sweet. How do I fix it? Add a little more salt (¼ tsp at a time) and a splash more vanilla. This balances the sweetness without changing the texture. The melted dark chocolate also helps cut sweetness significantly.
Can I pipe this frosting? Yes — it pipes beautifully. For stiff piped swirls, refrigerate the frosting for 20–30 minutes before piping. It holds its shape well at room temperature for a few hours.
Why is my frosting separating or looking curdled? Usually a temperature issue. If the butter was too cold, or if the melted chocolate was still too warm when added, the frosting can separate. Keep beating — it almost always comes together. If it doesn’t, warm the bowl slightly by setting it over a bowl of warm water for 30 seconds, then beat again.
Does this frosting crust over? Slightly, yes — which actually makes it great for decorating ahead of time. It won’t dry out completely like a royal icing, but it’ll form a thin skin that makes it easier to handle and transport.
Wrapping Up
Homemade chocolate frosting is one of those things that sounds like it requires skill, but really just requires a mixer, 10 minutes, and decent ingredients.
Make it once and you’ll never go back to the can. And once you add that splash of melted dark chocolate? It’s a completely different level.
Give it a try and come back to leave a comment below. I’d love to know what you put it on, any variations you tried, and any questions that came up along the way. 👇