I made this for my niece’s birthday party expecting the kids to like it, but somehow the adults fought over it just as hard.
That’s exactly the kind of drink this is. 🌈
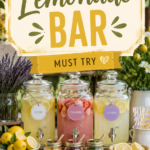
This fun drink is a colorful, layered mocktail made by gently pouring different fruit juices into a glass, creating a striped, rainbow-like effect from bottom to top.
It’s sweet, fruity, and genuinely fun to watch come together, which makes it just as entertaining to make as it is to drink.
And it comes together with basic juices you can grab at any grocery store, no special equipment required.
Here’s something worth knowing: this layering effect relies on a science concept called density, where liquids with more dissolved sugar sit lower in the glass than liquids with less. 🌈
It’s the same basic principle behind layered cocktails at fancy bars, just done here with kid-friendly juice instead.
Why This Recipe Works
The layered effect happens because different juices have slightly different densities, meaning some naturally sink while others stay closer to the top.
Pouring slowly and in order, from the densest juice to the lightest, is what allows each layer to stay separate instead of mixing together immediately.
Using juices with distinct colors, like grenadine, orange juice, and blue lemonade, makes the layers visually obvious and genuinely impressive looking once it’s all poured.
And because it’s built in layers rather than mixed together, every sip through a straw tastes slightly different depending on which layer you’re pulling from.
What You’ll Need
- 2 tbsp grenadine
- 1 cup orange juice
- 1 cup pineapple juice
- 1 cup blue lemonade or sports drink
- Ice
- Fruit slices or a cherry for garnish
That’s the full list, and it’s all easy to find at any regular grocery store.
Tools You’ll Need
- Tall, clear glasses
- A spoon for slow pouring
- Straws
How to Make a Fun Drink
Step 1: Add ice to your glass
Fill a tall, clear glass with ice cubes.
Step 2: Pour the grenadine
Pour the grenadine slowly over the ice, letting it settle at the bottom of the glass.
Step 3: Add the orange juice
Slowly pour the orange juice over the ice, using the back of a spoon to control the pour and help it layer instead of mixing immediately.
Hold the spoon just above the ice and let the juice trickle down it gently, rather than pouring straight from the bottle.
Step 4: Add the pineapple juice
Repeat the same slow pouring method with the pineapple juice, layering it on top of the orange juice.
Take your time here. Rushing this layer is the most common reason the colors end up blending instead of staying distinct.
Step 5: Add the final layer
Slowly pour the blue lemonade or sports drink on top as the final layer.
By this point, you should be able to see three or four distinct bands of color stacked on top of each other.
Step 6: Garnish and serve
Garnish with a fruit slice or cherry on top.
Serve immediately with a straw, before the layers have a chance to fully blend together.
Pro Tips
A handful of small details that genuinely improve this drink.
- Pour slowly, every single time. Rushing any layer causes it to mix with the one below it instead of staying separate.
- Use the back of a spoon as a guide. Letting the liquid run gently down a spoon rather than pouring directly into the glass helps control the flow.
- Use a clear glass. Part of the entire appeal of this drink is seeing the layers, so a clear glass is essential here.
- Layer from heaviest to lightest. Grenadine is dense and sinks well, while lighter juices stay higher up if poured last.
- Serve immediately after layering. The longer it sits, the more the layers naturally start to blend together.
- Practice with water and food coloring first if you’re nervous about pouring. It’s a low-stakes way to get a feel for the technique before doing it with real juice in front of guests.
Substitutions and Variations
- Want different colors? Swap in different juices based on what colors you’re going for, cranberry for red, grape juice for purple, or kiwi juice for green.
- Want it less sweet? Use sparkling water as the top layer instead of a sweetened lemonade or sports drink.
- Want it boozy? Add a splash of vodka or rum to each individual juice before layering for an adult version.
- No grenadine on hand? A mix of cranberry juice and a touch of sugar can work as a rough substitute.
- Want a tropical twist? Use coconut water as a base layer instead of one of the juices for a different flavor profile.
Make Ahead Tips
Each individual juice can be measured ahead of time and stored separately in the fridge, ready to pour whenever you want to make this drink.
I wouldn’t fully layer the drink ahead of time though, since it’s really meant to be assembled and enjoyed immediately for the best visual effect.
If you’re making these for a party, setting out the juices in small pitchers lets guests build their own layered drinks as they go.
Nutritional Info & Diet Swaps
One serving comes out to roughly 150-180 calories, depending on the exact juices and amounts used.
For a lower sugar version: Use unsweetened juices and a sparkling water top layer instead of a sweetened lemonade.
For a lower calorie version: Use smaller portions of each layer and top off the glass with extra ice or sparkling water.
This drink is naturally caffeine-free, gluten-free, and dairy-free as written.
Meal Pairing Suggestions
- Birthday party snacks: Pairs naturally with cake, cupcakes, and other celebratory treats.
- Pizza night: A fun, kid-friendly drink alongside a casual dinner.
- A summer barbecue: Works well as a colorful, crowd-pleasing drink option for outdoor gatherings.
- A pool party: The bright colors fit right into a fun, casual outdoor setting.
Time-Saving Tips
- Pre-measure each juice into small pitchers ahead of a party so guests can pour their own layers quickly.
- Keep all your juices stocked together in the fridge so this drink is always just a few pours away.
- Use a funnel for pouring if you want extra control over the layering process without needing a steady hand.
Leftovers and Storage
This drink really doesn’t have leftovers in the traditional sense, since it’s meant to be made and enjoyed immediately.
If you have extra juice from any individual layer, each one stores fine on its own in the fridge for later use.
FAQ
Why didn’t my layers separate properly? This usually means the juices were poured too quickly, or weren’t different enough in density. Pour slowly and choose juices with noticeably different sugar content for the best layering effect.
Can kids make this drink themselves? With some supervision for the pouring, yes, it’s a great hands-on activity for kids at a party.
How long do the layers stay separated before mixing? Usually just a few minutes before they start to blend slightly, which is why this drink is best made and served right away.
Can I make a big batch for a party? It’s better to set out individual juices and let guests build their own layered drinks one at a time, rather than trying to layer a large batch all at once.
What other liquids work well for layering? Juices with different sugar content tend to layer best. Sodas and sparkling water generally work better as a final top layer rather than in the middle.
Does the order of the layers really matter? Yes, pouring from the densest, sweetest liquid to the lightest one is what keeps everything properly separated instead of mixing right away.
Wrapping Up
This drink turned out to be just as fun to make as it was to drink, and that’s really the whole point of it.
A few juices, poured slowly and in order, create something that looks like way more effort than it actually took.
Make a batch for your next party and watch both the kids and the adults fight over who gets to pour the next one.
If you try this one, leave a comment below and let me know which colors and juices you used. I’d love to hear about it.