You know that moment when you take a bite of something and your brain goes “okay, we’re making this forever”?
That’s exactly what happens with this garlic parmesan chicken.
It’s crispy. It’s garlicky. The parmesan crust is golden and crackly and kind of ridiculous in the best way. And it comes together on a regular weeknight in under 40 minutes.
Here’s the part that surprises people: most restaurant-style chicken dishes that taste this good are hiding incredibly simple techniques. This one is no exception. You don’t need a culinary degree. You just need a skillet and a little patience.
Let’s get into it.
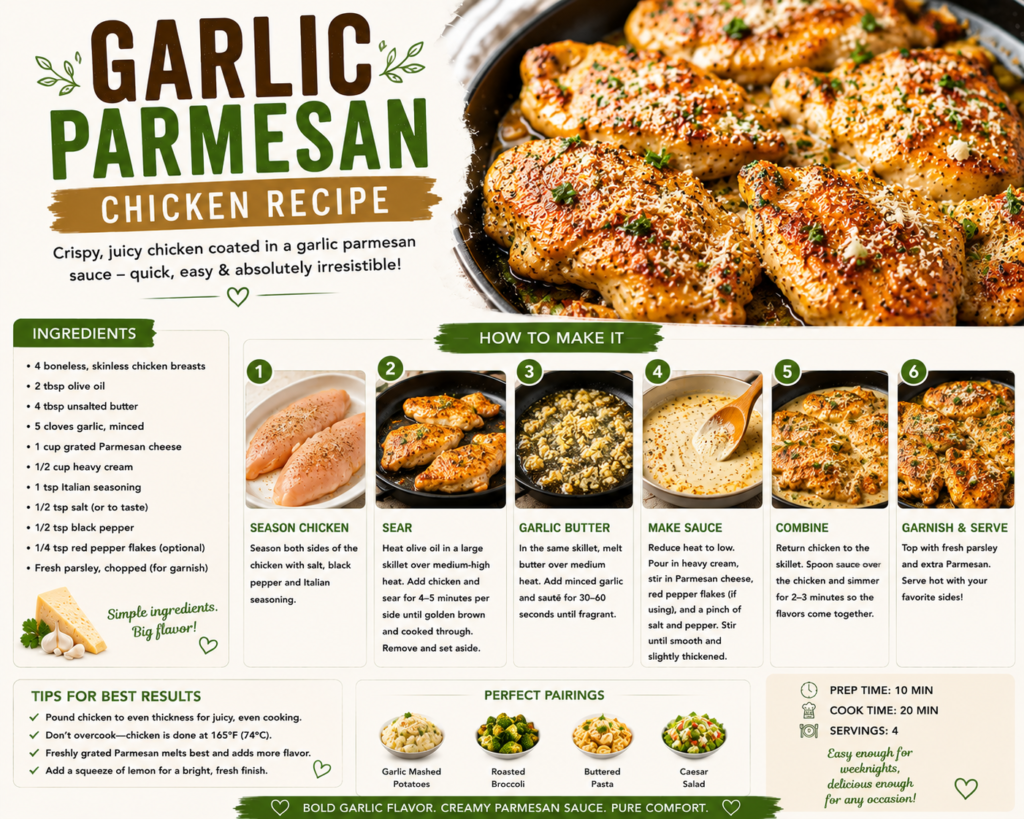
What You’ll Need
For the Chicken
- 4 boneless, skinless chicken breasts (about 6–8 oz each)
- 1 cup freshly grated parmesan cheese
- ½ cup panko breadcrumbs
- 1 tsp garlic powder
- 1 tsp onion powder
- 1 tsp dried Italian seasoning
- ½ tsp smoked paprika
- ½ tsp black pepper
- 1 tsp salt
- 2 large eggs
- 2 tbsp olive oil (for the skillet)
For the Garlic Butter Sauce
- 4 tbsp unsalted butter
- 6 cloves fresh garlic, minced
- 2 tbsp fresh parsley, chopped
- 1 tbsp fresh lemon juice
- ¼ tsp red pepper flakes (optional)
- Salt to taste
Tools You’ll Need
- Large oven-safe skillet (cast iron works beautifully here)
- Meat mallet or rolling pin
- 2 shallow bowls (for dredging)
- Tongs
- Instant-read thermometer
- Cutting board
- Chef’s knife
- Small saucepan (for the garlic butter)
Pro Tips
These are the things I wish I’d known the first time I made this.
1. Pound your chicken thin. Thick chicken breasts are the enemy of even cooking. Pound them to about ¾-inch thickness before anything else. It sounds like extra work. It’s not. Five minutes of effort, zero dry chicken.
2. Freshly grated parmesan only. The pre-shredded stuff has anti-caking agents that mess with the crust. Grate it yourself and you’ll notice the difference immediately. It melts into the crust rather than sitting on top of it.
3. Don’t move the chicken in the pan. Once it hits the skillet, leave it alone for 3–4 minutes. Resist the urge to peek or lift it early. That golden crust forms because of undisturbed contact with the heat. Every time you move it, you’re disrupting that process.
4. Finish in the oven. Starting on the stovetop and finishing in the oven (at 400°F for 8–10 minutes) is the secret to crispy outside, juicy inside. The skillet gives you the crust. The oven finishes the cook without burning it.
5. Make the garlic butter while the chicken rests. The chicken needs a 5-minute rest after cooking. Use that time to make the butter sauce. It comes together in less than 3 minutes and it is not optional. Trust me on this.
How to Make Garlic Parmesan Chicken
Step 1: Prep the Chicken
Place your chicken breasts between two sheets of plastic wrap (or in a zip-lock bag).
Use a meat mallet or rolling pin to pound them to an even ¾-inch thickness.
Pat them completely dry with paper towels. This step matters. Moisture is the enemy of a good crust.
Step 2: Set Up Your Dredging Station
In the first shallow bowl, whisk your 2 eggs until combined.
In the second bowl, mix together the parmesan, panko, garlic powder, onion powder, Italian seasoning, smoked paprika, salt, and pepper. Stir until everything is evenly distributed.
Step 3: Coat the Chicken
Dip each chicken breast into the egg, letting any excess drip off.
Then press it firmly into the parmesan mixture, making sure to coat both sides evenly. Press it in. You want that crust to stick.
Set the coated pieces on a plate while you heat the skillet.
Step 4: Sear the Chicken
Preheat your oven to 400°F.
Heat 2 tablespoons of olive oil in your oven-safe skillet over medium-high heat.
Once the oil shimmers (not smokes), add the chicken. Don’t crowd the pan. Cook in batches if needed.
Sear for 3–4 minutes without touching it. Flip once. Sear for another 2 minutes.
Step 5: Finish in the Oven
Transfer the whole skillet into the preheated oven.
Bake for 8–10 minutes, or until the internal temperature reads 165°F on your thermometer.
Remove from the oven and let the chicken rest on a cutting board for 5 minutes. This is what keeps it juicy.
Step 6: Make the Garlic Butter Sauce
While the chicken rests, melt the butter in a small saucepan over medium-low heat.
Add the minced garlic and cook for 1–2 minutes until fragrant. Don’t brown it.
Remove from heat. Stir in lemon juice, parsley, red pepper flakes, and salt.
Spoon generously over each chicken breast before serving.
Substitutions and Variations
Chicken thighs instead of breasts. Boneless, skinless thighs work great here and are actually harder to dry out. Add 3–4 extra minutes to the oven time.
Gluten-free version. Swap the panko for gluten-free breadcrumbs or crushed pork rinds. The texture is slightly different but still very good.
Dairy-free. Use nutritional yeast in place of parmesan (about ¾ cup) and vegan butter in the sauce. It won’t taste identical, but it’ll still work.
Extra spicy. Double the red pepper flakes in the sauce and add a pinch of cayenne to the coating mixture.
Air fryer option. Skip the skillet entirely. Air fry at 375°F for 12–14 minutes, flipping halfway through. Still crispy. Even easier cleanup.
Make Ahead Tips
Coat the chicken up to 24 hours ahead. After dredging, place the coated chicken on a wire rack set over a baking sheet. Cover loosely and refrigerate. The coating actually adheres better when it’s had time to set.
The garlic butter can be made 3–4 days in advance. Store it in an airtight container in the fridge and reheat gently before serving.
Freeze the uncooked coated chicken. Lay pieces flat on a parchment-lined tray, freeze until solid, then transfer to freezer bags. Cook straight from frozen at 400°F for about 25–30 minutes.
Nutritional Info (Per Serving)
| Nutrient | Amount |
|---|---|
| Calories | ~420 kcal |
| Protein | 48g |
| Carbohydrates | 10g |
| Fat | 22g |
| Saturated Fat | 9g |
| Sodium | 780mg |
| Fiber | 0.5g |
Based on one chicken breast with sauce, using full-fat butter and parmesan.
Meal Pairing Suggestions
This chicken is pretty versatile. A few combinations that work especially well:
- Simple roasted vegetables (zucchini, cherry tomatoes, asparagus) on the same sheet pan
- Buttered egg noodles or linguine tossed with a little of the extra garlic butter sauce
- A crisp arugula salad with lemon vinaigrette to cut through the richness
- Garlic mashed potatoes if you’re fully committing to a comfort food night
- Steamed rice for a lighter pairing that still soaks up all that sauce
Leftovers and Storage
Fridge: Store leftovers in an airtight container for up to 3 days.
Reheating: The oven is your friend here. 350°F for about 10 minutes keeps the crust from going soggy. Avoid the microwave if you can. It works, but the crust suffers.
Freezer: Cooked chicken can be frozen for up to 2 months. Wrap each piece individually before placing in a freezer bag. Reheat from frozen in the oven at 375°F for 20–25 minutes.
Repurposing leftovers: Slice cold leftovers thin and pile them on crusty bread with arugula and a little mayo. You’re welcome.
FAQ
Can I use pre-shredded parmesan? You can, but freshly grated gives you a significantly better crust. Pre-shredded contains additives that prevent it from melting and binding the same way. It’s a small effort with a big payoff.
My crust keeps falling off. What am I doing wrong? Two likely culprits: the chicken wasn’t dry enough before coating (pat it very dry), or you moved it too soon in the pan (leave it untouched for the full 3–4 minutes). Also, pressing the coating in firmly during dredging helps it stick.
Can I make this without the oven? Yes, but you’ll need to cook it entirely on the stovetop over medium heat, which means lower heat and longer time (about 6–7 minutes per side) to avoid burning the crust before the inside cooks through. An instant-read thermometer is your best tool here.
Can I use garlic paste instead of fresh garlic? Fresh is better for the sauce, but garlic paste works in a pinch. Use about 1 tablespoon in place of the 6 cloves.
What if I don’t have a cast iron skillet? Any oven-safe skillet works. Stainless steel is a great second choice. If your skillet isn’t oven-safe, sear the chicken, then transfer to a baking dish before finishing in the oven.
Is there a way to make this lower calorie? Use less butter (2 tbsp instead of 4) in the sauce, and reduce the parmesan in the coating slightly. The result will still be delicious, just a bit lighter.
Wrapping Up
Here’s the thing about this garlic parmesan chicken: it’s one of those recipes that looks like you worked way harder than you actually did. 😄
The crispy parmesan crust, the garlic butter pooling around the edges, the golden color… it all just looks like a restaurant plate. But you made it in your own kitchen on a Tuesday night.
And that’s kind of the point.
Give it a try this week, and when you do, come back and leave a comment below. Tell me how it turned out, what you swapped, what you served it with. Especially if you made the air fryer version — I’d love to know how that went for you.
Questions? Drop them below. I read every single one.