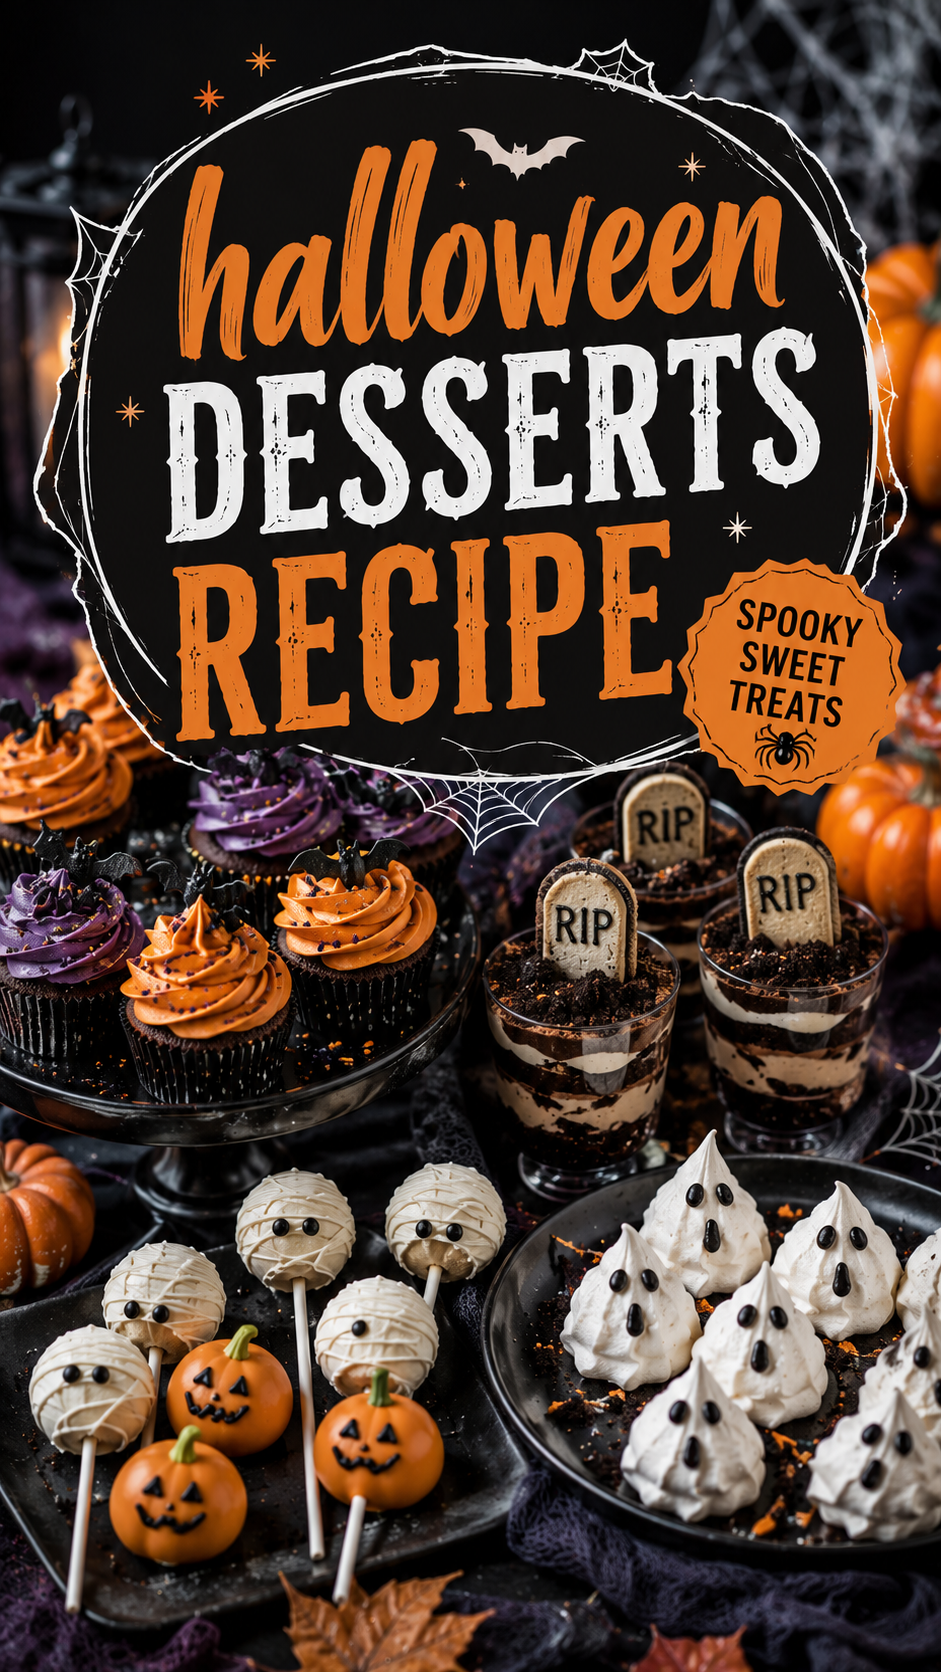
Can four different Halloween desserts actually come together on one table without taking all day?
I used to think a dessert spread like this meant an entire weekend in the kitchen. Then I broke it down into pieces, made a few things ahead, and realized the whole thing comes together faster than one complicated cake.
Graveyard dirt pudding cups, mummy cake pops, pumpkin cake pops, and meringue ghosts, all sitting together on one table like something out of a bakery display. 🍮
Here’s exactly how to make the whole spread.
What You’ll Need
Here’s everything going into this dessert table:
For the graveyard dirt pudding cups:
- 2 cups chocolate pudding (homemade or instant)
- 1 cup crushed chocolate sandwich cookies
- Tombstone-shaped cookies (store-bought or homemade sugar cookies with “RIP” piped on)
- Whipped cream (optional layer)
For the mummy and pumpkin cake pops:
- 1 baked cake (any flavor), crumbled
- 1/2 cup frosting
- White candy melts
- Orange candy melts
- Green candy melts (for pumpkin stems)
- Black gel icing or mini candy eyes
- Cake pop sticks
For the meringue ghosts:
- 3 large egg whites
- 3/4 cup granulated sugar
- 1/4 tsp cream of tartar
- 1/2 tsp vanilla extract
- Black gel icing (for the faces)
That’s the full ingredient list for the whole dessert table.
Tools You’ll Need
- A piping bag with a round tip
- Parchment paper and a baking sheet
- An electric mixer
- Small clear cups (for the pudding)
- A microwave-safe bowl (for melting candy melts)
- A cooling rack
How to Make It
Graveyard Dirt Pudding Cups
Layer a spoonful of crushed cookies at the bottom of each cup. Add a layer of pudding, then whipped cream if using, then another layer of crushed cookies on top.
Press a tombstone cookie into the top layer of each cup, angled slightly like it’s sinking into the dirt.
Mummy and Pumpkin Cake Pops
Mix the crumbled cake with frosting until it holds together when pressed. Roll into small balls and chill for 30 minutes.
Insert a cake pop stick into each ball. Melt the white candy melts and dip half of your cake balls, letting the excess drip off. Once set, drizzle back and forth to create the mummy wrapping look, then add small dots of black gel icing for eyes.
For the pumpkin pops, dip the remaining cake balls in melted orange candy melts. Once set, use a toothpick dipped in black gel icing to draw a jack-o’-lantern face. Add a small piece of melted green candy melt on top for the stem.
Meringue Ghosts
Preheat your oven to 200°F and line a baking sheet with parchment paper.
Beat the egg whites and cream of tartar until foamy. Slowly add the sugar, one tablespoon at a time, beating until stiff, glossy peaks form. Mix in the vanilla.
Transfer to a piping bag fitted with a round tip. Pipe ghost shapes onto the parchment paper, starting wide at the base and pulling up into a peak.
Bake for 90 minutes, then turn off the oven and let the meringues sit inside for another hour to fully dry out.
Once cooled, add two small dots of black gel icing for eyes on each ghost.
Pro Tips
- Chill your cake pop mixture before rolling. Warm cake crumbles are sticky and hard to shape into clean balls.
- Thin your candy melts if they seem too thick. A small splash of coconut oil helps them coat smoothly without cracking.
- Don’t open the oven while your meringues bake. Sudden temperature changes can cause cracks in the shells.
- Assemble the pudding cups the same day you serve them. The cookie layers can get soggy if they sit too long before serving.
- Pipe your ghosts on a humid day if you can avoid it. Meringue is sensitive to moisture and can turn sticky instead of crisp.
Substitutions and Variations
- Pudding swap: Vanilla pudding with cookie crumbs dyed with black food coloring works as an alternative dirt look.
- Cake pop base: A boxed cake mix works just as well as a homemade cake here.
- Dairy-free meringues: Aquafaba, the liquid from a can of chickpeas, can replace egg whites in the meringue recipe.
- Different toppers: Candy eyeballs work as a quick swap instead of piped icing for both the cake pops and meringues.
- Extra spooky: Add a few gummy worms poking out of the pudding cups for extra effect.
Make Ahead Tips
Meringue ghosts can be made up to a week ahead and stored in an airtight container at room temperature, since moisture is their only real enemy.
Cake pops can be made 2-3 days ahead and stored in the fridge, then brought to room temperature before serving.
Assemble the pudding cups the same day, but you can prep the crushed cookies and pudding a day in advance to save time.
Additional Details
Nutritional Breakdown (Per Serving, one of each item)
| Nutrient | Amount |
|---|---|
| Calories | ~380 |
| Protein | 5g |
| Carbs | 52g |
| Fat | 16g |
| Sugar | 38g |
Note: Values are estimates and will vary depending on exact ingredients used.
Meal Pairing Ideas
- Serve with hot chocolate or apple cider for a cozy fall dessert table.
- Pair with coffee for an adult Halloween gathering.
- Add a bowl of candy corn alongside for extra color and crunch.
Time Efficiency Tips
- Make the meringues first since they need the longest hands-off bake and cool time.
- Prep the cake pop mixture while the meringues bake to keep things moving.
- Assemble the pudding cups last so the cookie layers stay crisp until serving.
Leftovers and Storage
Store meringue ghosts in an airtight container at room temperature for up to a week. Keep them away from humidity or they’ll soften.
Cake pops keep well in the fridge for up to 5 days. Let them sit at room temperature for 15 minutes before serving for the best texture.
Pudding cups are best eaten within a day of assembly, since the cookie layers soften the longer they sit.
FAQ
Can I make the meringue ghosts ahead of a party? Yes, up to a week ahead. Just keep them stored in a completely airtight container away from moisture.
Why did my meringues turn out chewy instead of crisp? This usually happens from underbaking or humidity in the air. A longer, low and slow bake with time to dry out in the oven helps a lot.
Can I skip making cake from scratch for the cake pops? Yes, a boxed cake mix works perfectly fine and saves a good amount of time.
How far ahead can I assemble the pudding cups? Same day is best. The layers can get soggy if they sit in the fridge for more than a few hours.
What if I don’t have candy melts? White or dark chocolate chips melted with a small amount of shortening or coconut oil work as a substitute.
Wrapping Up
This dessert table proves you don’t need one complicated showstopper to impress people at a Halloween party.
Four simple treats, made in stages, coming together into a spread that looks like way more effort than it actually took.
Try building this table for your next Halloween gathering and let me know how it turned out in the comments below. And if you added your own spooky twist to any of these, I’d love to hear what you made.