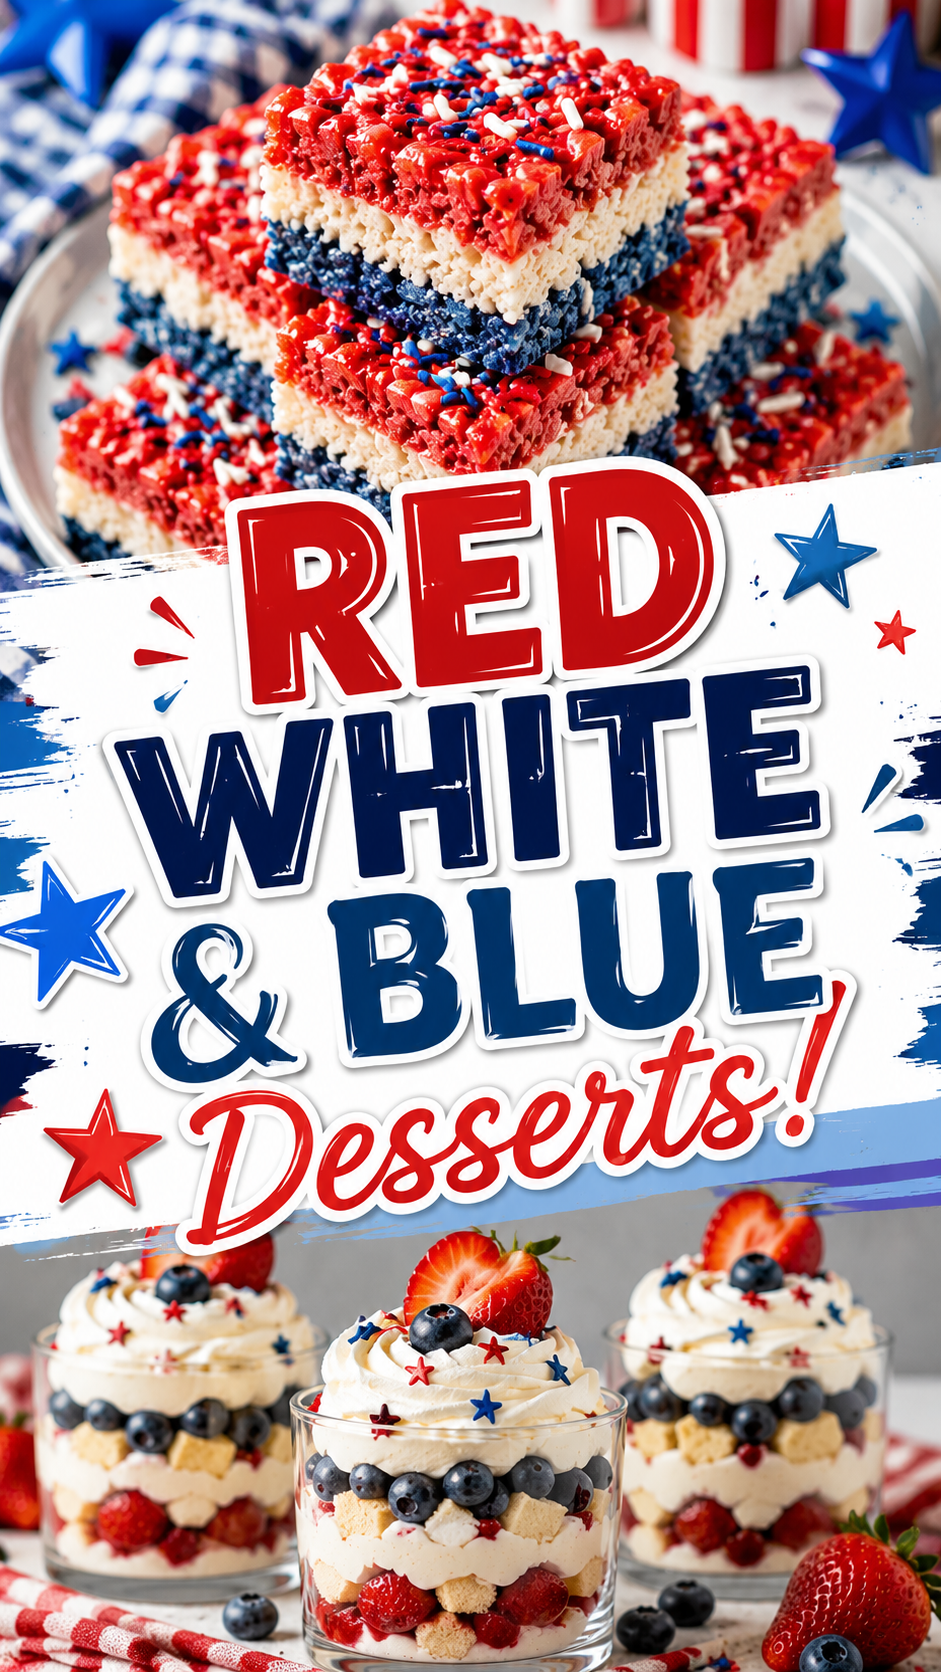
You didn’t come here for a basic dessert. You came here because you want to put something on that table that makes people stop mid-conversation and just stare. 👀
These Patriotic Rice Krispie Treats do exactly that.
Red, white, and blue layers. Buttery, gooey, crispy. Topped with sprinkles so patriotic they practically salute you. And the wildest part? They take under 30 minutes to make.
No baking. No chilling overnight. No stress.
Just three gloriously colored layers of the most satisfying, crowd-pleasing dessert you’ll ever pull out of a 9×13 pan.
Stick around, because there’s a trick in the Pro Tips section that completely changes the texture of these (most people skip it and their treats end up too hard).
What You’ll Need
For the Treats
- 9 cups Rice Krispies cereal, divided (3 cups per color layer)
- 3 bags (10 oz each) mini marshmallows, divided (one per layer)
- 6 tablespoons unsalted butter, divided (2 tablespoons per layer)
- Red gel food coloring
- Blue gel food coloring
- 1/2 teaspoon vanilla extract (per layer, so 1.5 teaspoons total)
- Pinch of salt (per layer)
For the Topping
- 1/2 cup red, white, and blue sprinkles or star-shaped sprinkles
- Optional: red and blue candy melts for drizzling
Tools You’ll Need
- 9×13 inch baking pan
- Large saucepan or pot (you’ll use it three times)
- Rubber spatula or silicone spoon
- Parchment paper
- Cooking spray or butter for greasing
- Measuring cups and spoons
- Bowl of warm water (for pressing — you’ll see why below)
Pro Tips
These are the things I wish someone had told me the first time I made layered Rice Krispie treats:
- Use gel food coloring, not liquid. Liquid food coloring throws off the moisture ratio in the marshmallow mixture and can make the treats sticky or soggy. Gel gives you that deep, vivid red and blue without messing with the texture at all.
- Undercook the marshmallows slightly. The second they’re fully melted and smooth, pull the pan off the heat. Every extra second over heat makes your treats harder once they set. Gooey treats = slightly undercooked marshmallow mixture.
- Wet your hands before pressing each layer. This is the game-changer. Dip your fingertips in warm water before pressing each layer into the pan and the mixture won’t stick to you at all. No fighting it. No torn parchment.
- Press the layers gently — don’t compact them. The tighter you press, the harder and denser the treats. Gentle pressure gives you that light, airy, crispy bite everyone’s going for.
- Let each layer cool for 5 to 8 minutes before adding the next. Not fully cool, just firm enough that the next layer won’t bleed into it. This is what gives you those clean, defined color lines.
How to Make Red, White & Blue Rice Krispie Treats
Prep time: 10 minutes Cook time: 20 minutes Total time: 30 minutes (plus 30 minutes to set) Yield: 24 squares
Step 1: Prep Your Pan
Line your 9×13 pan with parchment paper and spray generously with cooking spray. Set aside.
Step 2: Make the Red Layer
In a large saucepan, melt 2 tablespoons of butter over medium-low heat.
Add one full bag (10 oz) of mini marshmallows and stir constantly until completely melted and smooth.
Remove from heat. Add 1/2 teaspoon vanilla extract, a pinch of salt, and enough red gel food coloring to reach a deep, vivid red. Stir quickly.
Fold in 3 cups of Rice Krispies cereal until fully coated.
Press the mixture evenly into the bottom of your prepared pan using wet fingertips. Let sit for 5 to 8 minutes.
Step 3: Make the White Layer
Repeat the same process: melt 2 tablespoons butter, add marshmallows, stir until smooth. Add vanilla and salt. Skip the food coloring for this layer.
Fold in 3 cups cereal. Press gently on top of the red layer. Let sit for 5 to 8 minutes.
Step 4: Make the Blue Layer
Same process again. This time, add blue gel food coloring to reach a deep navy or royal blue.
Fold in the last 3 cups of cereal. Press gently on top of the white layer.
Step 5: Add Toppings
While the blue layer is still slightly warm (not fully set), scatter your red, white, and blue sprinkles generously across the top. Gently press them in with the flat of your hand so they stick.
If you want the extra wow factor, melt some red and blue candy melts separately and drizzle them across the top in a zigzag pattern.
Step 6: Set and Cut
Let the entire pan cool at room temperature for at least 30 minutes before cutting. Use a sharp knife sprayed lightly with cooking spray for the cleanest cuts.
Cut into 24 squares and try not to eat three before they hit the serving plate.
Substitutions & Variations
| Swap | Use This Instead |
|---|---|
| Unsalted butter | Salted butter (just skip the extra pinch of salt) |
| Mini marshmallows | Regular marshmallows (about 40, melted) |
| Rice Krispies | Fruity Pebbles for extra color pop |
| Gel food coloring | Natural plant-based food dyes (colors will be softer) |
| Sprinkles on top | Crushed freeze-dried strawberries + blueberries |
Want a richer treat? Brown the butter before adding the marshmallows. It adds a nutty, caramel-like depth that’s genuinely hard to stop eating.
Allergy-friendly? Use vegan butter and vegan marshmallows (Dandies brand works perfectly) for a fully dairy-free and gelatin-free version.
Make-Ahead Tips
These are actually better the next day once the layers have fully settled.
Make them up to 48 hours in advance. Store covered at room temperature — the fridge makes them hard and dry.
If you’re making them more than a day out, add the sprinkles right before serving so they stay crisp and colorful.
Nutritional Info (Per Square, Approximate)
| Amount | |
|---|---|
| Calories | 185 kcal |
| Carbohydrates | 38g |
| Fat | 4g |
| Protein | 1g |
| Sugar | 22g |
These are estimates based on standard ingredient amounts.
Meal & Occasion Pairing Ideas
- 4th of July BBQ: Pair with watermelon, lemonade, and grilled corn
- Memorial Day potluck: These travel incredibly well — just keep them in the pan until you get there
- School parties or team celebrations: Cut into smaller pieces for a crowd
- Movie nights at home: Red, white, and blue for anything patriotic-themed
Leftovers & Storage
Room temperature: Store in an airtight container for up to 4 days. Layer sheets of parchment between pieces so they don’t stick together.
Freezer: Yes, these freeze well. Wrap individual squares tightly in plastic wrap, then place in a freezer bag. Freeze up to 6 weeks. Thaw at room temperature for 30 minutes before serving.
Do not store in the refrigerator. Cold air dries them out and makes them impossibly hard to bite.
FAQ
Why are my Rice Krispie treats hard? You either overcooked the marshmallow mixture or pressed the layers too firmly into the pan. Both compact the structure and remove the air pockets that make them light and chewy. Cook on low heat and press gently.
Can I use regular food coloring instead of gel? You can, but the colors will be much less vivid and the added liquid can affect the texture. Gel food coloring is worth buying for this one.
How do I get clean, sharp layers? Let each layer rest for 5 to 8 minutes before adding the next. It should be firm enough to hold its shape but still slightly tacky so the next layer sticks to it.
Can I double the recipe? You can make two separate 9×13 pans. Don’t try to fit a double batch into one pan — the layers won’t press evenly and you’ll lose the defined color separation.
My blue layer keeps looking purple. What’s happening? The white marshmallow base can turn blue slightly purple when mixed. Use a royal blue or navy gel food coloring and add a little more than you think you need. It darkens slightly as it sets.
Can kids make this? The stovetop steps need adult supervision, but once the layers are made and cooling, kids can handle the sprinkles and pressing. It’s a genuinely fun activity for the whole house.
Wrapping Up
You’ve got your red layer, your white layer, your blue layer, your sprinkles, and 30 minutes between you and one of the most visually striking desserts you’ll ever make.
No oven. No complicated technique. Just butter, marshmallows, cereal, and a little food coloring working together to create something that genuinely looks like it took serious effort.
Make these once and I guarantee they become your go-to for every summer celebration from here on out.
Drop a comment below and tell me how yours turned out. Did you try the browned butter version? Did you add candy melt drizzles? Did someone at your BBQ actually try to take the whole pan home? I want to know. 👇