You’ve seen the loaves on Instagram. That deep, crackly crust. The perfectly open crumb. And you thought, I could never.
You can. And this is how.
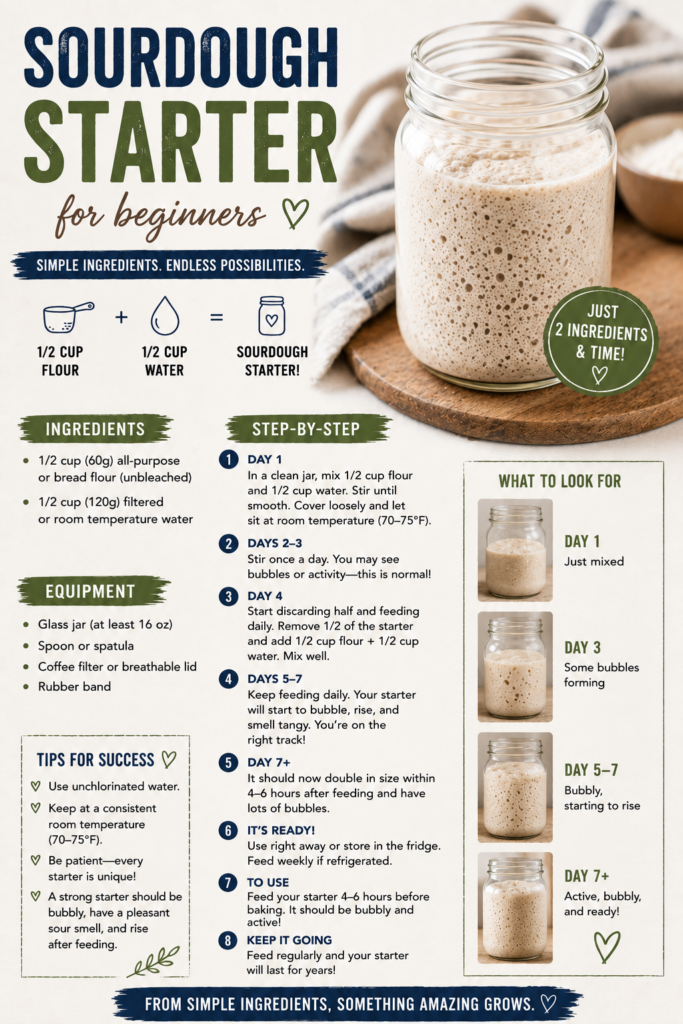
Making a sourdough starter from scratch sounds like a science experiment, but it’s really just flour, water, and a little patience. Once you nail it, you’ll have a living ingredient that can power your baking for years. Literally years.
Stick around because there’s a trick in the Pro Tips section that most beginner guides completely skip — and it changes everything.
What Is a Sourdough Starter (And Why Should You Care)?
A sourdough starter is a fermented mixture of flour and water that captures wild yeast and good bacteria from your environment.
No store-bought yeast needed. Your kitchen air does the work.
That fermentation is what gives sourdough its signature tangy flavor, chewy texture, and that crust that sounds like music when you tap it. It also makes the bread easier to digest than regular yeast bread — the fermentation process breaks down gluten and phytic acid, which can be hard on your gut.
Basically, it’s old-school bread science and it’s been around for over 5,000 years. 🍞
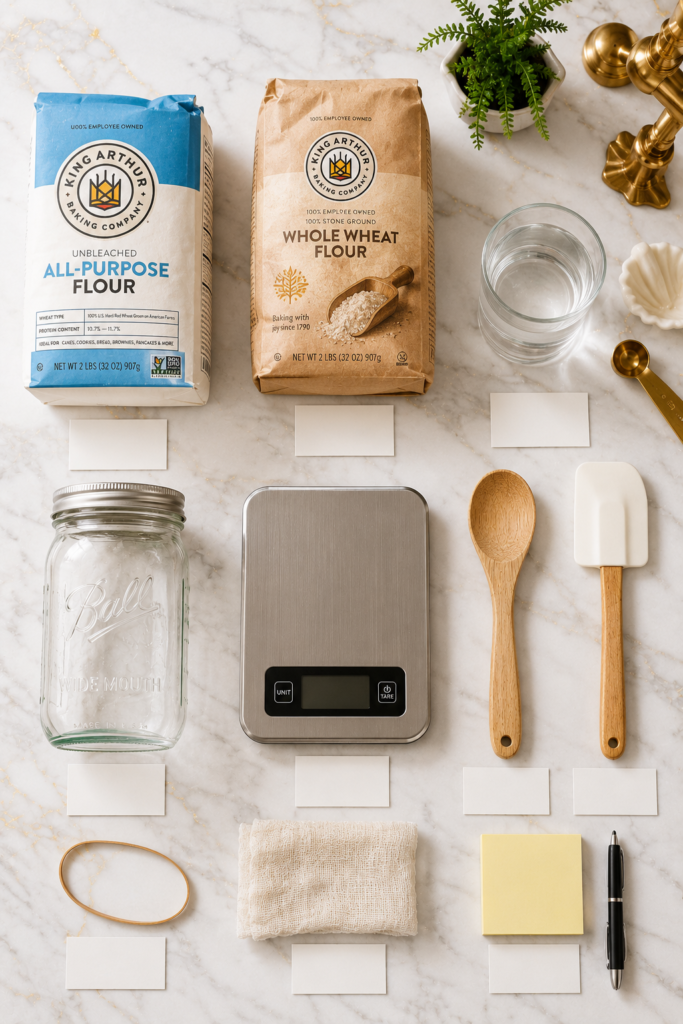
What You’ll Need
For the Starter:
- 1 cup (120g) whole wheat flour (for Day 1 only)
- Unbleached all-purpose flour (for feeding Days 2–7)
- Filtered or room-temperature tap water (chlorine-free is best)
That’s it. Two ingredients. Just make sure your water isn’t straight from a cold tap — lukewarm works best.
Note on flour: Whole wheat flour on Day 1 gives the starter a natural boost because it has more wild yeast and nutrients. After that, all-purpose flour works perfectly fine.
Tools You’ll Need
- 1 large glass jar (at least 32 oz / 1 liter) — a wide-mouth mason jar is ideal
- Kitchen scale (grams are more accurate than cups for this)
- Rubber spatula or wooden spoon
- Rubber band or piece of tape (to track rise)
- Loose lid, cheesecloth, or paper towel to cover (not airtight)
- Pen and paper or sticky note for daily notes
Pro Tips
These are the things that actually make a difference, especially your first time.
1. Use a kitchen scale. Measuring by weight instead of volume gives you consistent results every single time. A few grams off with flour doesn’t sound like much, but it actually matters here.
2. Filtered water is your friend. Tap water with heavy chlorine can slow down or kill your starter. If you only have tap water, leave it in an open glass for 30 minutes before using — the chlorine will off-gas.
3. Temperature matters more than anything. Your starter thrives at 70°F–80°F (21°C–27°C). Too cold and it moves slow. Too hot and it can die. The top of your refrigerator, or a warm corner of your kitchen, is often the sweet spot.
4. Don’t panic if it smells weird. Days 2–3, your starter might smell like acetone, cheese, or even nail polish remover. That’s completely normal. It means bacteria are doing their thing before the yeast kicks in.
5. The float test is your checkpoint. Drop a small spoonful of your starter into a glass of water. If it floats, it’s active and ready to use. If it sinks, give it another 4–8 hours.
Step-by-Step Instructions
Day 1: The Beginning
- Weigh your jar and write down the weight (you’ll subtract this when measuring starter later).
- Add 60g whole wheat flour and 60g lukewarm water to the jar.
- Mix until no dry flour remains. The consistency should look like thick pancake batter.
- Loosely cover the jar (don’t seal it — it needs airflow).
- Leave it at room temperature for 24 hours.
Days 2–7: Daily Feedings
Starting on Day 2, you’ll feed your starter once per day using this simple ratio:
| What You’re Adding | Amount |
|---|---|
| Existing starter (keep) | 50g |
| All-purpose flour | 50g |
| Lukewarm water | 50g |
Here’s how each feeding works:
- Discard all but 50g of your starter. (Yes, you throw some away. This is normal and necessary.)
- Add 50g flour and 50g water to the remaining starter.
- Mix well until combined.
- Mark the level with your rubber band.
- Cover loosely and leave at room temperature for 24 hours.
Repeat this every day for 7 days.
What You Should See Each Day
| Day | What’s Normal |
|---|---|
| Day 1 | Nothing much. Just a thick paste. |
| Day 2 | Small bubbles forming. Maybe a funky smell. |
| Day 3 | More bubbles. Possible funky smell getting stronger. |
| Day 4–5 | Bubbles on the surface and sides. Rising and falling between feedings. |
| Day 6–7 | Doubling in size within 4–8 hours. Smells tangy and yeasty. Ready to use! |
How to Know Your Starter Is Ready
Your starter is ready to use when it:
- Doubles in size within 4–8 hours of feeding
- Smells pleasantly tangy (like yogurt or mild vinegar)
- Has lots of bubbles throughout
- Passes the float test
If it’s Day 7 and it’s still sluggish, give it a few more days. Some starters just take longer depending on your environment and flour.
Substitutions and Variations
Flour options:
- Rye flour on Day 1 instead of whole wheat — rye is even more active and can speed things up
- Bread flour instead of all-purpose for feeding — gives a slightly more elastic starter
- Gluten-free starter — use a 1:1 gluten-free flour blend, though the process can be less predictable
Water options:
- Bottled spring water works great if your tap water is heavily chlorinated
- Well water is usually fine as-is
Feeding ratio options:
- Once your starter is established, you can switch to a 1:2:2 ratio (1 part starter : 2 parts flour : 2 parts water) if you bake less frequently — it extends the time between feedings.
Make Ahead Tips
Once your starter is active and established, you don’t need to feed it every single day.
For less frequent baking: Store your starter in the fridge with a loosely fitted lid. Feed it once a week. Pull it out the night before you want to bake, feed it, and let it come to room temperature and peak.
For a backup: Once you have an active starter, dry some of it out. Spread a thin layer on parchment paper, let it dry completely, then crumble it up and store it in a sealed bag. You now have a dried backup that lasts for months — and can even be mailed to friends. 😄
Nutrition at a Glance
This is for the bread you’ll eventually make, not the starter itself — but it’s good to know what you’re signing up for.
| Nutrient | Per Slice (Approx.) |
|---|---|
| Calories | 100–120 |
| Protein | 4g |
| Carbohydrates | 20g |
| Fiber | 1–2g |
| Fat | 0.5g |
Sourdough also has a lower glycemic index than regular bread, meaning it causes a slower rise in blood sugar. Worth noting if that matters to you.
Meal Pairing Suggestions
Once you’ve got your starter going and your first loaf baked, here are some great ways to use it:
- Avocado toast — sourdough’s tang pairs perfectly with creamy avocado and a pinch of chili flakes
- Soup — a thick tomato or lentil soup next to a thick slice is just unbeatable
- Grilled cheese — sourdough grilled cheese is on another level compared to regular sandwich bread
- Eggs — a poached egg on toasted sourdough? Breakfast of champions
Leftovers and Storage
Storing your active starter:
- Keep it at room temperature if you bake daily
- Refrigerate it if you bake weekly — feed once a week minimum
What to do with discard:
Don’t toss the daily discard every time. It builds up fast. Use it to make:
- Sourdough pancakes
- Sourdough crackers
- Sourdough banana bread
- Pizza dough
The discard isn’t the same as an active starter (it won’t leaven bread on its own), but it adds incredible flavor to recipes.
FAQ
Q: My starter has liquid on top. Did I kill it?
Nope. That liquid is called “hooch” — it’s alcohol that forms when the starter is hungry. Just pour it off or stir it back in before your next feeding. It means your starter is ready for more food.
Q: Can I use all-purpose flour for Day 1?
You can, but whole wheat or rye will give it a faster start because they contain more natural wild yeast.
Q: My starter isn’t rising. What do I do?
Check the temperature of your kitchen first. If it’s below 68°F (20°C), the process slows dramatically. Try placing your jar in your oven with just the oven light on — that small warmth can make a real difference.
Q: Can I name my starter?
Absolutely and you probably should. Baker culture basically requires it. Classic names include Doughlmadur, Fermentina, and Yeastie Boys. 😄
Q: How long does a sourdough starter last?
With regular feeding, indefinitely. The oldest known sourdough starter is over 120 years old and is still being used today. You’re essentially creating a family heirloom.
Q: Do I need to buy a special jar?
A wide-mouth mason jar works perfectly. Just make sure it’s big enough — the starter can more than double in size, so give it room.
Wrapping Up
Here’s the thing about sourdough: it’s not just bread baking. It’s one of those skills that once you have it, you kind of can’t believe you went so long without it.
You get to watch something come alive in your kitchen over seven days, made from nothing but flour and water. And then you turn it into a loaf that tastes better than anything you’ll find at most grocery stores.
It takes some attention, sure. But it doesn’t take much time — just 5 minutes a day for a week. That’s it.
Give it a shot. And when you bake your first loaf with your new starter, come back here and tell me how it went. Drop your questions in the comments too — this is one of those recipes where the little details really matter and I’m happy to help you troubleshoot.