I’d heard about summer pudding for years before I ever actually made one, mostly because the name made it sound more complicated than it actually is.
Turns out, this is one of the easiest desserts I’ve ever made, despite how impressive it looks once it’s unmolded. 🫐
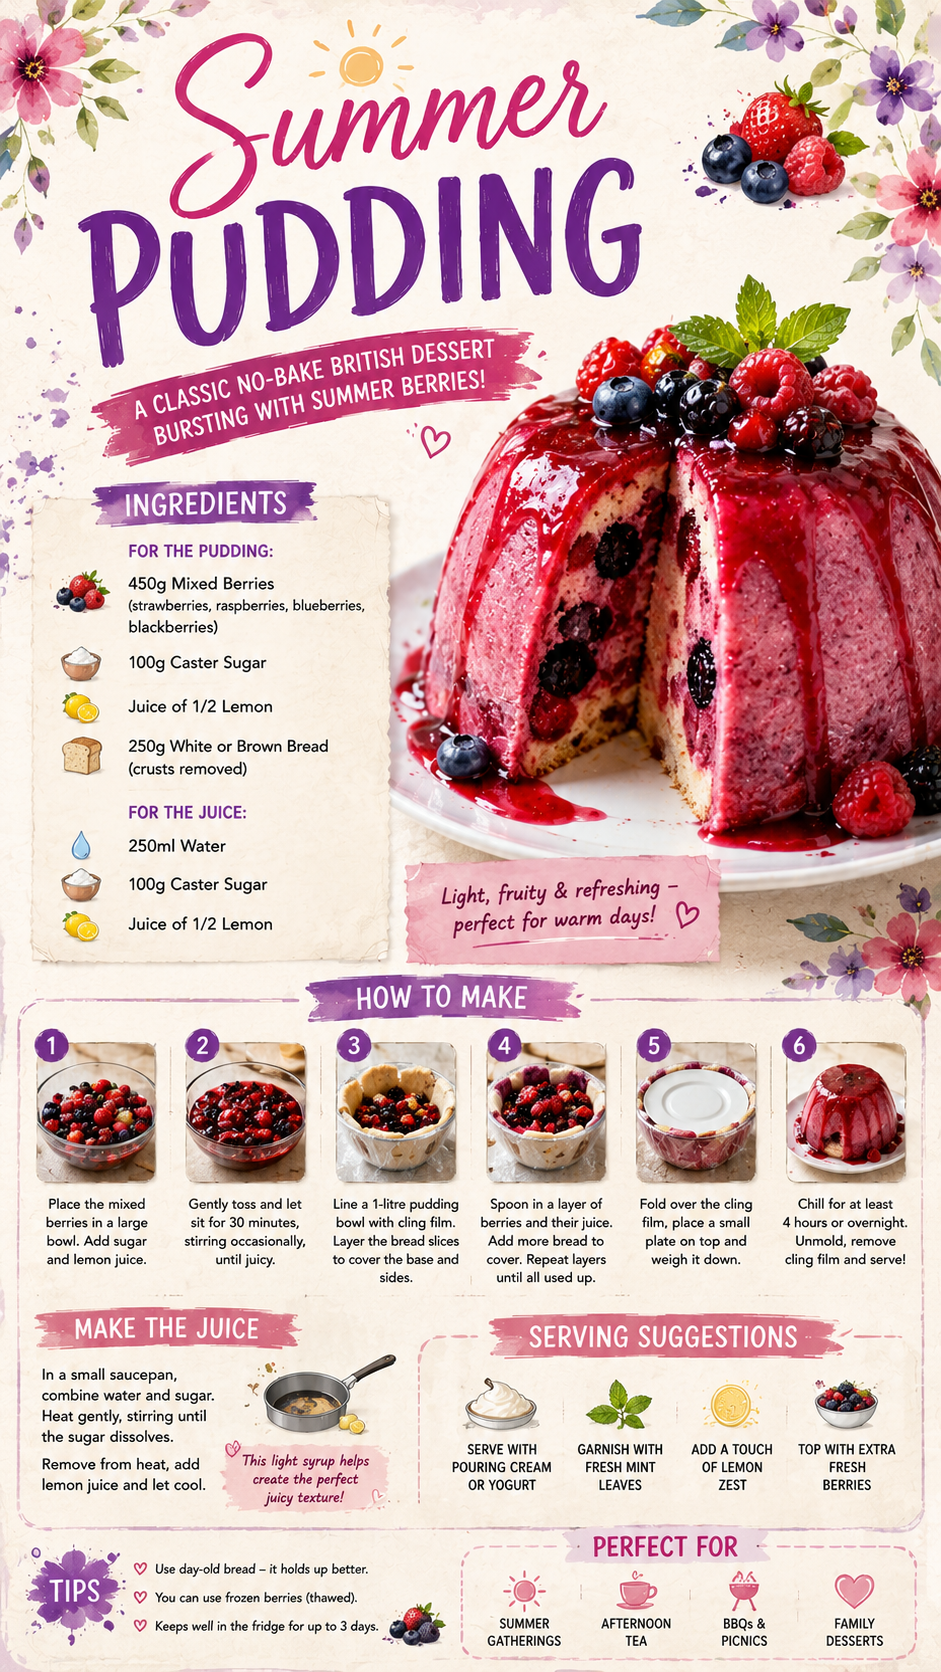
Summer pudding is a classic British dessert made by lining a bowl with bread, filling it with cooked summer berries, and chilling it until the bread soaks up all that deep, fruity juice.
No baking, no oven required at all, just bread, berries, and patience while it sets in the fridge.
It’s the kind of dessert that looks like it took real skill, when really it’s mostly about waiting.
Here’s something worth knowing: summer pudding dates back at least to the 1800s in England, originally created as a way to use up an abundance of summer berries without needing to turn on the oven during the hottest months of the year. 🫐
That same logic still holds up today, it’s a genuinely smart, practical way to use berries at their peak.
Why This Recipe Works
The bread acts almost like a sponge here, soaking up the berry juices as the pudding chills, until it transforms into something closer to a soft, juicy cake than actual bread.
Cooking the berries briefly before assembling releases their juices fully, giving you enough liquid to properly soak through every layer of bread.
Chilling it under weight for several hours is what compresses everything together, helping the pudding hold its shape once it’s turned out of the bowl.
And because it’s served cold, it’s a genuinely refreshing dessert for hot summer days, when turning on the oven feels like the last thing you want to do.
What You’ll Need
- 8-10 slices white bread, crusts removed
- 4 cups mixed summer berries (strawberries, raspberries, blackberries, blueberries)
- ⅓ cup granulated sugar
- 1 tbsp lemon juice
- Whipped cream for serving (optional)
That’s the full list, and it’s about as simple as a dessert with this much visual impact can be.
Tools You’ll Need
- Medium-sized bowl
- Saucepan
- Plastic wrap
- A plate and a heavy can or weight for pressing
- Serving plate
How to Make Summer Pudding
Step 1: Cook the berries
Combine the berries, sugar, and lemon juice in a saucepan over medium heat.
Cook for about 5-7 minutes, stirring occasionally, until the berries soften and release their juices.
Remove from heat and let it cool slightly.
The mixture should look glossy and deeply colored at this point, with plenty of liquid pooling around the softened fruit.
Step 2: Line the bowl
Line a medium-sized bowl with plastic wrap, leaving extra hanging over the edges.
Arrange the bread slices around the inside of the bowl, trimming pieces as needed to fully cover the bottom and sides, with no gaps.
Overlapping the edges of each piece slightly helps prevent any berry juice from leaking through during chilling.
Step 3: Fill with berries
Spoon the cooked berries and their juices into the bread-lined bowl.
Reserve a little of the juice for serving later.
Step 4: Top with more bread
Cover the top of the berries completely with the remaining bread slices, trimming as needed to fit.
Step 5: Press and chill
Fold the excess plastic wrap over the top.
Place a plate on top of the bowl, then add a heavy can or weight on top of the plate to press everything down.
Refrigerate for at least 6 hours, or overnight for the best results.
Step 6: Unmold and serve
Remove the weight and plate, then unfold the plastic wrap.
Place a serving plate over the bowl and flip it over, then gently lift the bowl away.
Drizzle with the reserved berry juice and serve with whipped cream if desired.
Pro Tips
A handful of small details that genuinely improve this dessert.
- Use slightly stale bread. It holds its shape a little better than very fresh, soft bread once soaked with juice.
- Don’t skip the weighting step. This is what gives the pudding its dense, sliceable texture once it’s unmolded.
- Save extra berry juice for serving. It makes for a beautiful, glossy finish once drizzled over the top.
- Use a mix of berries, not just one type. It creates a more complex flavor and a deeper, richer color throughout.
- Chill it for the full time, or longer. Rushing this step means the bread won’t fully soak through, leaving dry patches in the finished pudding.
- Use a clear glass bowl if you have one. It lets you see the juice working its way through the bread, which is honestly satisfying to watch as it sets.
Substitutions and Variations
- No fresh berries available? Frozen mixed berries work well too, just thaw them slightly before cooking.
- Want it less sweet? Reduce the sugar slightly, especially if your berries are already very ripe and sweet.
- No white bread on hand? Brioche or a soft sandwich bread both work as substitutes, though the texture will be a little richer.
- Want a single-berry version? Use all strawberries or all raspberries instead of a mix, for a more focused flavor.
- Want individual portions? Make this in small ramekins instead of one large bowl for personal-sized puddings.
Make Ahead Tips
This dessert is essentially built to be made ahead, since it needs several hours to properly chill and set.
Make it the day before you plan to serve it, and keep it in the fridge until you’re ready to unmold and serve.
This makes it a genuinely stress-free dessert option for dinner parties, since all the real work happens well before guests arrive.
Nutritional Info & Diet Swaps
One serving (this recipe makes about 6-8 servings) comes out to roughly 180-200 calories, depending on the exact bread and amount of berries used.
For a lower sugar version: Reduce the added sugar and lean more on naturally sweet, ripe berries.
For a dairy-free version: Skip the whipped cream topping, or use a dairy-free whipped topping alternative.
Meal Pairing Suggestions
- A light summer lunch: Works well as a dessert following something simple like a salad or sandwich.
- Afternoon tea: A classic, traditional pairing for this particular dessert.
- A dinner party finale: Looks impressive enough to serve as the final course for guests.
- A garden party spread: Fits naturally alongside other light, classic British-style dishes.
Time-Saving Tips
- Make this a day ahead so the chilling time overlaps with other prep for an event.
- Use pre-trimmed sandwich bread to skip the step of cutting off crusts yourself.
- Use frozen berries to skip the step of washing and prepping fresh ones.
Leftovers and Storage
Store any leftovers covered in the fridge for up to 3 days.
The texture continues to soften slightly over time, though it’s still enjoyable for a few days after making it.
I don’t recommend freezing this dessert, since the bread’s texture changes significantly once thawed.
FAQ
Do I need a special mold for this recipe? No, a regular bowl works perfectly well. The shape doesn’t need to be anything special.
Why didn’t my pudding hold its shape when I unmolded it? This usually means it wasn’t weighted or chilled long enough. Both steps are essential for the bread to properly compress and hold together.
Can I use a different type of bread? Yes, though white bread is traditional, brioche or another soft, plain bread can work as a substitute.
Is summer pudding the same as a trifle? No, a trifle typically involves layers of cake, custard, and fruit in a glass dish, while summer pudding is a single molded dessert made primarily from bread and berries.
Can I make this dessert without cooking the berries first? Cooking them helps release enough juice to properly soak the bread, so skipping this step usually results in a drier, less flavorful pudding.
How far in advance can I make this for a party? It holds up well in the fridge for up to 2 days before serving, which makes it a genuinely convenient make-ahead option for entertaining.
Wrapping Up
This dessert turned out to be far simpler than its slightly fancy reputation suggested, and that’s honestly part of why I love making it now.
Bread, berries, a little sugar, and a lot of patience while it chills. That’s genuinely the whole process.
Make this one for your next summer gathering and watch people be surprised by how easy it actually was.
If you try this one, leave a comment below and let me know how it turned out, or which berries you used. I’d love to hear about it.