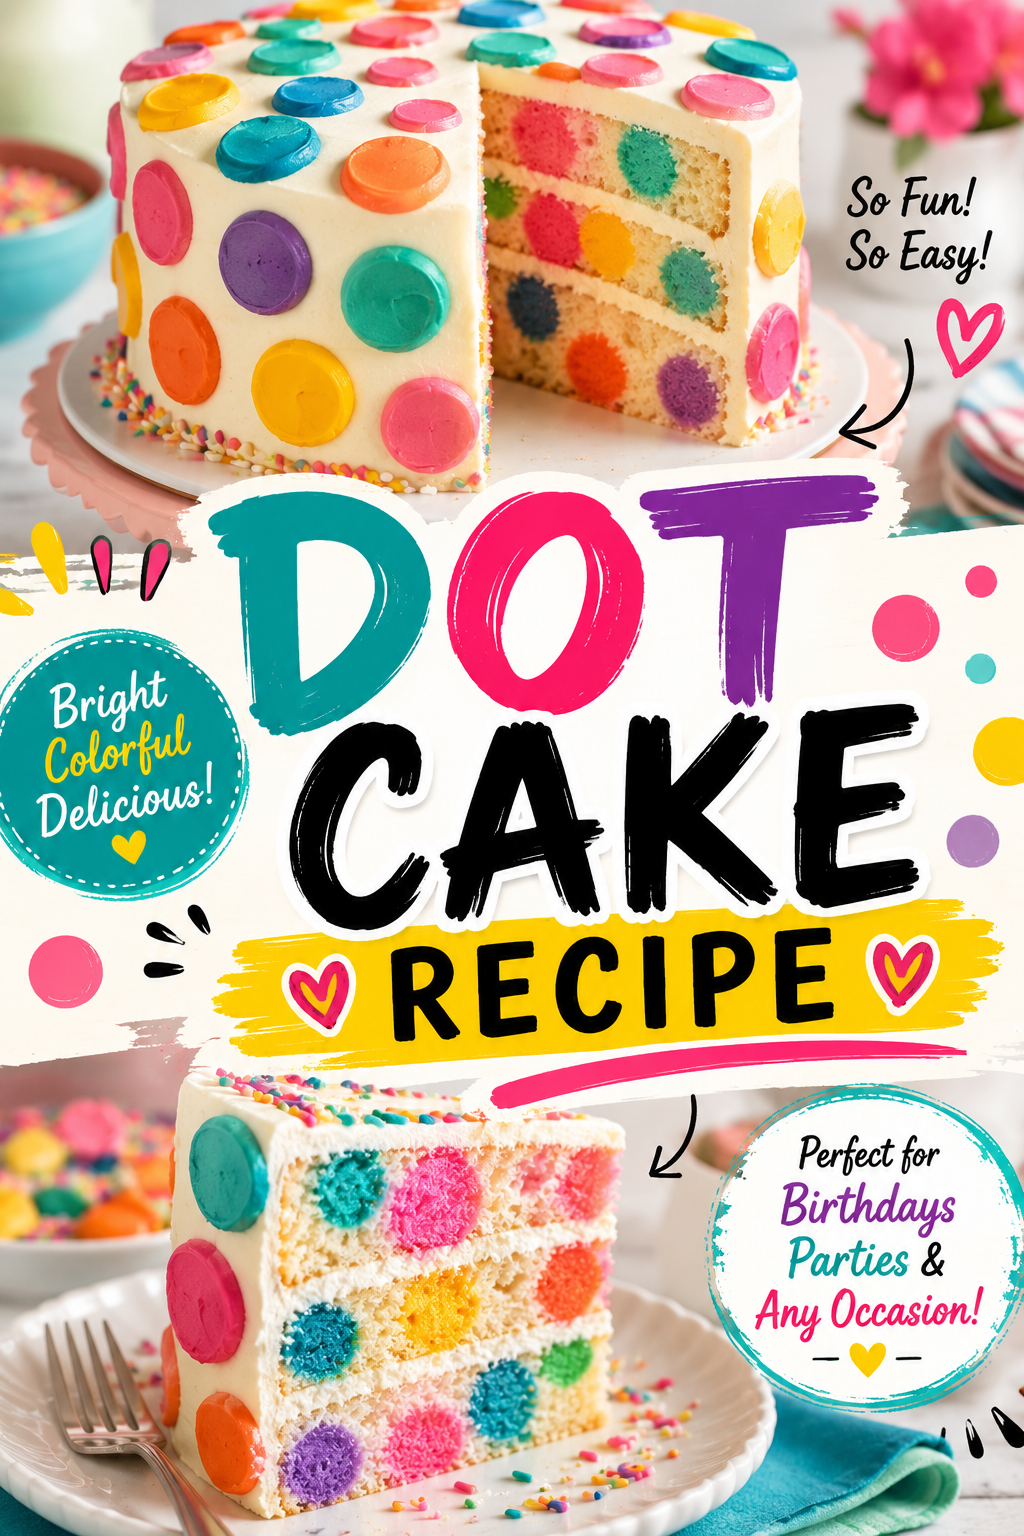
You slice into it. Confetti-colored dots burst out from the inside. Every single person in the room gasps.
That’s the dot cake effect. And yes, it’s as fun to make as it looks.
This is one of those recipes that feels like a party trick but actually isn’t that hard. A few extra steps? Sure. But the payoff is absolutely worth it — especially when you see the look on people’s faces when you cut the first slice.
So if you’ve been wanting to bake something genuinely show-stopping without spending 8 hours in the kitchen, keep reading. I’ve got everything you need right here.
What You’ll Need
For the Cake Layers
- 3 cups (375g) all-purpose flour
- 2 ½ tsp baking powder
- ½ tsp salt
- 1 cup (225g) unsalted butter, softened to room temperature
- 2 cups (400g) granulated sugar
- 4 large eggs, room temperature
- 1 tbsp pure vanilla extract
- 1 cup (240ml) whole milk, room temperature
- Gel food coloring in 6 colors (pink, blue, green, yellow, orange, purple)
For the Vanilla Buttercream Frosting
- 2 cups (450g) unsalted butter, softened
- 6 cups (720g) powdered sugar, sifted
- 4–5 tbsp heavy cream
- 2 tsp pure vanilla extract
- Pinch of salt
For the Polka Dot Decorations (Outside)
- 1 cup (200g) white chocolate chips or melting wafers
- Gel food coloring (same 6 colors as above)
- Silicone circle mold (1–1.5 inch circles)
Tools You’ll Need
- Three 8-inch round cake pans
- Stand mixer or hand mixer
- Mixing bowls (at least 6 small ones for the colored batter)
- Rubber spatulas
- Round cookie cutter or small circle cutter (1–1.5 inch)
- Silicone circle mold (for outside dots)
- Offset spatula
- Bench scraper
- Cake turntable (optional but very helpful)
- Piping bags
- Toothpicks
- Wire cooling racks
- Parchment paper
Pro Tips
- Use gel food coloring, not liquid. Liquid dye waters down the batter and gives you dull, sad colors. Gel gives you those bright, vivid hues that make the cake pop when you slice it.
- Don’t overbake the dot inserts. The colored circles you bake separately need to be just done — if they dry out, they’ll crumble when you press them into the batter. Pull them out the moment a toothpick comes out clean.
- Chill everything before frosting. Seriously, don’t skip this. Frost a warm cake and you’ll get a crumb nightmare. Chill the layers for at least 30 minutes before assembling and frosting.
- Make your outside dots ahead of time. Melt the chocolate, color it, pour into the silicone molds, and refrigerate for a few hours or overnight. This saves you a ton of stress on assembly day.
- Press the outside dots on before the final coat of frosting fully sets. If it’s already hardened, the dots won’t stick. You want the frosting to still be slightly tacky when you add them.
How to Make the Dot Cake
Step 1: Bake the Colored Dot Inserts
These are the colored circles that get pressed into the batter before baking, giving you the surprise inside the cake.
- Preheat your oven to 325°F (163°C). Line a small baking sheet with parchment paper.
- Make one-quarter batch of cake batter (recipe below). Divide it into 6 small bowls.
- Add a few drops of gel food coloring to each bowl and mix until the color is vivid.
- Spread each color thinly onto the lined baking sheet (about ¼ inch thick).
- Bake for 8–10 minutes, until just set. Don’t overbake.
- Let cool completely, then use your round cutter to cut out circles.
- Set aside on parchment. You’ll use these in Step 3.
Step 2: Make the Main Cake Batter
- Preheat your oven to 350°F (175°C). Grease and line three 8-inch round cake pans.
- Whisk together flour, baking powder, and salt in a bowl. Set aside.
- In a stand mixer, beat butter and sugar on medium-high for 4–5 minutes until pale and fluffy.
- Add eggs one at a time, beating well after each. Mix in vanilla.
- Alternate adding the flour mixture and milk in three additions, beginning and ending with flour. Mix until just combined — don’t overwork it.
Step 3: Add the Dot Inserts
This is the fun part 🎉
- Pour a thin layer of plain batter into each prepared cake pan, just enough to cover the bottom.
- Stand your colored circles upright in the batter, spacing them evenly around the pan. Press them in gently — they should be standing vertical, not lying flat. This is what creates the dot cross-section when you slice.
- Pour the remaining batter over and around the colored circles, filling each pan about two-thirds full.
- Smooth the tops with a spatula.
Step 4: Bake
- Bake at 350°F for 28–32 minutes, until a toothpick inserted in the center comes out clean.
- Let the cakes cool in the pans for 10 minutes, then turn out onto wire racks.
- Cool completely before frosting — at least 1 hour, or refrigerate for 30 minutes.
Step 5: Make the Buttercream
- Beat the butter in a stand mixer for 3–4 minutes until very light and fluffy.
- Add sifted powdered sugar one cup at a time, mixing on low.
- Add heavy cream, vanilla, and salt. Beat on medium-high for 2 minutes until smooth and creamy.
- If it’s too thick, add another tablespoon of cream. Too thin? Add a bit more powdered sugar.
Step 6: Make the Outside Chocolate Dots
- Melt white chocolate wafers in short 30-second bursts in the microwave. Stir between each burst until fully melted.
- Divide into 6 small bowls and color each with gel food coloring.
- Pour into silicone circle molds.
- Refrigerate for at least 1 hour until fully set.
Step 7: Assemble and Frost
- Level the cake layers if needed using a serrated knife.
- Place the first layer on your cake board or turntable. Spread a generous layer of buttercream.
- Repeat with the remaining layers.
- Apply a thin crumb coat all over the cake. Refrigerate for 20 minutes.
- Apply the final coat of frosting, smoothing the sides with a bench scraper.
Step 8: Add the Outside Dots
- Pop the chocolate dots out of their molds.
- While the frosting is still slightly tacky, press the colored dots onto the cake in a random, playful pattern.
- Finish with a ring of sprinkles around the base if you want extra flair.
Substitutions and Variations
| Swap | Use Instead |
|---|---|
| Whole milk | Buttermilk (adds slight tang, super moist) |
| Butter in cake | Equal part vegetable oil (denser, more moist) |
| White chocolate dots | Fondant circles (easier, no melting needed) |
| Vanilla extract | Almond extract for a different flavor |
| 3 cake layers | 2 layers (just increase batter per pan slightly) |
Want to make it chocolate? Replace ½ cup of flour with ½ cup cocoa powder for a chocolate base. The colored dots inside look even more dramatic against a dark crumb.
Making it for adults? Add a teaspoon of espresso powder to the batter. It deepens the vanilla flavor in a really unexpected way.
Make-Ahead Tips
- Cake layers: Bake up to 2 days ahead. Wrap tightly in plastic wrap and store at room temperature, or refrigerate for up to 5 days.
- Buttercream: Makes up to 1 week ahead. Store in an airtight container in the fridge. Let it come to room temperature and re-beat before using.
- Chocolate dots: Make 1–2 days ahead and keep refrigerated in the mold until you’re ready to assemble.
- Fully assembled cake: Can be refrigerated for up to 2 days before serving.
Nutrition (Approximate Per Slice, 12 Servings)
| Nutrient | Amount |
|---|---|
| Calories | ~580 |
| Total Fat | 28g |
| Saturated Fat | 17g |
| Carbohydrates | 78g |
| Sugar | 58g |
| Protein | 5g |
Values will vary based on exact ingredients and portion size.
Leftovers and Storage
- Room temperature: Store covered for up to 2 days (if your kitchen isn’t too warm).
- Refrigerator: Store in an airtight container or cover sliced sections with plastic wrap. Lasts up to 5 days. Let slices come to room temp before eating — cold buttercream is never as good.
- Freezer: Wrap individual slices in plastic wrap, then foil. Freeze for up to 2 months. Thaw overnight in the fridge.
FAQ
Do the colored dots actually show up when you cut the cake?
Yes! As long as you stand the circles upright in the batter before baking. If you lay them flat, you’ll get colored layers instead of dots. The vertical placement is the whole trick.
Can I use regular food coloring instead of gel?
Gel is really the way to go here. Regular liquid coloring dilutes the batter and gives you washed-out pastels instead of those bold, vivid colors you see in the photos.
My dot inserts crumbled when I tried to use them. What happened?
They were either overbaked or too thin. Aim for ¼ inch thickness and pull them from the oven the second a toothpick comes out clean. They should feel soft and pliable, not dry.
Can I make this as a smaller cake?
Absolutely. Use two 6-inch pans instead of three 8-inch pans. Reduce baking time by about 5 minutes and keep an eye on it.
The outside dots aren’t sticking to the frosting. Help?
The frosting dried out too much before you applied them. Next time, add the dots while the final coat is still slightly tacky. If it’s already hardened, very lightly warm your fingertip and gently press each dot in.
Can I make this dairy-free?
You can! Swap butter for vegan butter (like Miyoko’s), milk for oat milk, and use dairy-free white chocolate for the outside dots. The texture will be slightly different but still really good.
Wrapping Up
This dot cake looks like it took a professional baker two days to pull off. The secret? It just takes a bit of patience and the right steps in the right order.
The inside reveal alone is worth every minute of effort. Cut that first slice, watch everyone’s reaction, and try not to smile too much.
Give it a try and drop a comment below telling me how it went! Did your colors turn out vivid? Did people freak out when they saw the inside? Any questions along the way — I’m right here. 👇