I grew up thinking pickles were just… pickles. Sour, a little sad, straight from a jar in the fridge door.
Then I made bread and butter pickles from scratch for the first time and honestly, it kind of ruined store-bought for me.
These are sweet, tangy, a little spiced, and they’ve got this crunch that jarred pickles just can’t touch. My husband Silas ate half the batch standing over the stove before they even finished cooling. No shame.
And here’s the surprising part: you don’t need a canning setup or any fancy equipment to make these. You can have a jar of these in your fridge by tonight.
Let’s get into it.
What You’ll Need
- 1.5 lbs pickling cucumbers (Kirby cucumbers work great), sliced into ¼ inch rounds
- 1 medium yellow onion, thinly sliced
- 3 tablespoons kosher salt
- 1.5 cups apple cider vinegar
- 1.5 cups granulated sugar
- 1 teaspoon mustard seeds
- 1 teaspoon celery seeds
- ½ teaspoon ground turmeric
- ¼ teaspoon whole black peppercorns
- 1 small garlic clove, smashed (optional, but I always add it)
That’s it. Nothing weird, nothing you have to hunt down at a specialty store.
Tools You’ll Need
- Large mixing bowl
- Colander
- Medium saucepan
- Wooden spoon or heatproof spatula
- 2 pint-sized mason jars (or one quart jar) with lids
- Measuring cups and spoons
Let’s Make Bread & Butter Pickles
Step 1: Salt the Cucumbers and Onion
Toss your sliced cucumbers and onion in a large bowl with the kosher salt.
Mix well so everything gets coated. Let it sit for 1 to 2 hours at room temperature.
This step pulls water out of the cucumbers, which is exactly why homemade pickles stay crunchy instead of going soft. Skip it and you’ll notice the difference.
Step 2: Rinse and Drain
After the sitting time, dump everything into a colander and rinse thoroughly under cold water.
You want to get most of that salt off. Give it a good shake to drain, then set aside.
Step 3: Make the Brine
In your saucepan, combine the apple cider vinegar, sugar, mustard seeds, celery seeds, turmeric, peppercorns, and garlic if you’re using it.
Bring it to a boil over medium heat, stirring occasionally so the sugar fully dissolves.
Once it hits a boil, let it go for about 1 minute, then take it off the heat.
Step 4: Combine
Add your drained cucumbers and onions straight into the hot brine.
Stir gently so everything gets coated. The cucumbers will start to look slightly translucent almost immediately. That’s a good sign.
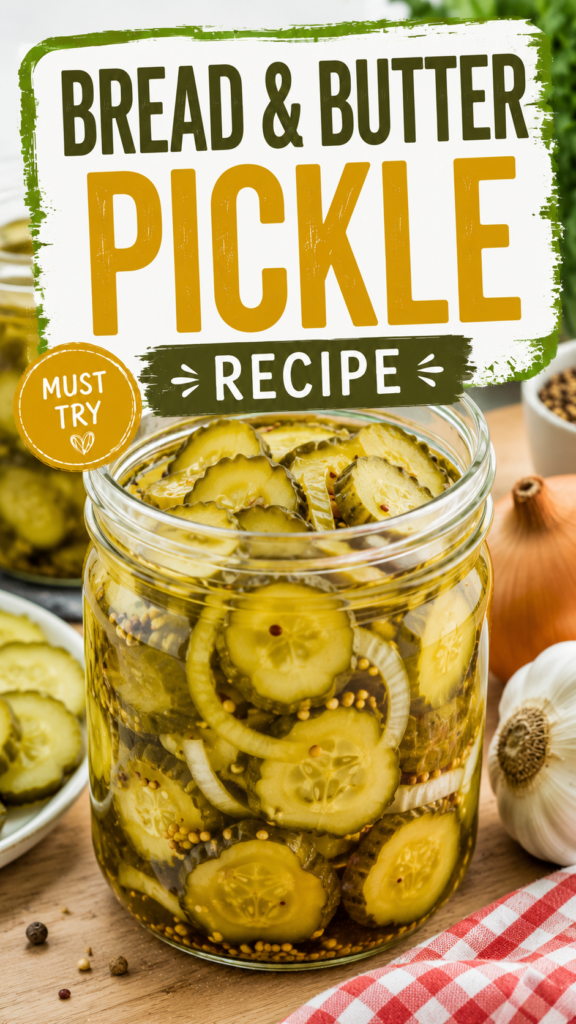
Step 5: Jar It Up
Pack the cucumber and onion mixture into your mason jars, then pour the remaining brine over the top until everything is fully submerged.
Let the jars cool on the counter for about 30 minutes before putting the lids on.
Step 6: Chill
Pop the jars in the fridge for at least 4 hours, though overnight is even better.
They’ll keep getting more flavorful over the next few days, so try to be patient. I know it’s hard.
Pro Tips
Slice your cucumbers evenly. Uneven slices mean uneven pickling, and some pieces end up too soft while others barely absorb any brine.
Don’t skip the salting step. I tried once when I was in a rush and the pickles turned out noticeably softer. Big mistake.
Use fresh, firm cucumbers. Soft or bruised cucumbers were never going to turn into crunchy pickles no matter how long you soak them in brine.
Taste your brine before pouring it. If you like things extra tangy, add a splash more vinegar. If you want it sweeter, add another tablespoon of sugar.
Sterilize your jars if you’re planning to store these longer than two weeks. A quick run through the dishwasher on the hottest setting works fine.
Substitutions & Variations
Want to switch things up? Here’s a quick table of easy swaps.
| Original Ingredient | Swap Option | What It Changes |
|---|---|---|
| Apple cider vinegar | White vinegar | Sharper, less fruity flavor |
| Granulated sugar | Honey | Deeper, slightly floral sweetness |
| Kirby cucumbers | English cucumbers | Slightly less crunch, still tasty |
| Yellow onion | Red onion | Prettier color, slightly sharper bite |
| Turmeric | Skip it | Less golden color, still delicious |
If you like heat, throw in a sliced jalapeño or a pinch of red pepper flakes with the brine. It adds a nice kick without overpowering the sweetness.
Make Ahead Tips
These pickles are honestly better the next day, so making them ahead isn’t just convenient, it actually improves the flavor.
You can make a batch up to a week before you need them for a barbecue, a burger night, or just because you want pickles ready to go in your fridge at all times (relatable).
A Few Extra Details
Nutrition (per ¼ cup serving): Roughly 45 calories, 0g fat, 11g carbs, 10g sugar, and 300mg sodium. These numbers will shift a bit depending on how much brine ends up in your serving.
Diet notes: These pickles are naturally vegan, gluten free, and dairy free as written. If you’re watching sodium, you can reduce the salt in the salting step slightly, though it may affect the crunch factor a bit.
Pairing ideas: These are made for burgers and sandwiches, but I also love chopping them up into tuna salad or serving them next to a cheese board. They cut through anything rich and fatty in the best way.
Time saving tip: If you’re short on time, you can shorten the salting step to 30 minutes. The pickles won’t be quite as crunchy, but they’ll still taste great.
Leftovers & Storage
Keep your pickles in the fridge in their sealed jar. They’ll stay good for up to 2 months if refrigerated properly.
Always use a clean fork or spoon when grabbing pickles from the jar. Double dipping with a used utensil is basically inviting bacteria to the party.
FAQ
Can I use regular cucumbers instead of pickling cucumbers?
You can, but the texture won’t be quite as crisp. Pickling cucumbers have less water content, which is exactly what you want here.
Why did my pickles turn out soft?
This usually comes down to skipping the salting step or using cucumbers that weren’t fresh enough to begin with.
Do I need to can these for long term storage?
Not for this recipe. These are refrigerator pickles, meant to be stored cold and eaten within a couple months. If you want shelf-stable jars, you’d need a proper water bath canning process, which is a different method altogether.
How long until they’re ready to eat?
Technically 4 hours, but the flavor really comes together after a full 24 hours in the fridge.
Can I double the recipe?
Absolutely. Just make sure you have enough jars and that everything stays fully submerged in the brine.
Wrapping Up
Once you make these, you’ll probably start finding excuses to put them on everything. Burgers, sandwiches, straight out of the jar standing at the fridge (no judgment, I do it too).
There’s something so satisfying about pulling a jar of homemade pickles out of your fridge that you made with your own two hands.
Give this recipe a try this week and let me know how it goes in the comments below. I’d love to hear what you paired them with, or if you tried any of the swaps from the table above.
Got questions before you start? Drop them below and I’ll get back to you.